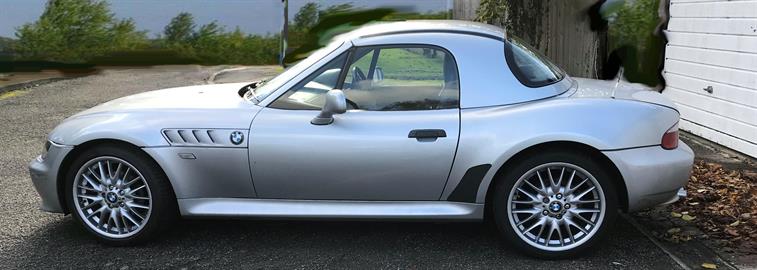
2.2 Straight Six 5 Speed Manual Convertible Titan Silver 2171ccm 170HP 125KW Petrol
My Diary Of An BMW Z3
Z3 2002 Engine 2.2 5 Speed Manual
Nigel G Wilcox
click
AC Compressor BMW BMW 3 E46 / 5 E39 / Z3 E36 8390646 Genuine Reman A/C
“This AC is fully repaired and tested. We have equipment on which we can check if AC makes cold ” (comforting to know)?
Two years with the start of year three, how time flies by..... Let us hope that this year will be a better one for many of us; leaving the pandemic behind, there is also the Brexit and all the uncertainties for the past 5 years being put behind us and for some, the dealing with loss of family members, a sad reality.
We need to now look forward and to start the new year of 2021 with a positive approach, with more of a 'back to normality' attitude or even to have a better outlook' for many of us, post-pandemic and there are still those with stubborn remainer mindsets - a brand new start as an independent British Sovereign Nation, with emphasis towards Democracy and Freedom with bringing of polititions, the elite, the left, the Lords and the BBC to account - A smell of British Air; of course I am now looking at 'The Freedom of the Road,' and the joys of motoring with a car that is now ready for the road....that is if they don't hit us with all green mentality and changeover to a battery over night philosophy so, as to build up their coffers, but! It gives us peasants a pupose to fight back for fairness...OK, that is just my opinion and I digress to reality; as I always do!)
So! What is on the todo's list for 2021 looking to be rectified this year?
1. Sort out the drop in the front bumper and rectify (I have replacement brackets now - a job still pending) 2. Prepare and respray the back bumper (I have the equipment, a job still pending) 3. Sort out some small minute dents in o/s door, (when funds permit - tap out may get specialist perhaps)? (again not urgent) Rear o/s wing has a slight dent, (not too noticeable, may need a skim of filler and a touch up) 4. Mirror indicators, fitting and wiring up, (Have units) motorised mirror direction switch has also gone down - could be the fuse? A need to tighten O/S door handle also. the mirror cowling could do with a respray N/S too! 5. A/C Auxiliary fan replacement fitting - (Have Unit - Fitting pending) Awaiting better weather 6. A/C Air evacuation and Re-gas - (Have the appropriate gauges/air pump and small can of gas - job pending) 7. Oil Change & filters - (have oil and filters)Transmission oil change, (pending purchase of latter - Also better weather) 8. Front and rear springs - (have replacements) need a few other replacement fittings) - change or upgrade pending 9. Re-do the running lights/front indicators, (Have replacements- pending) 10. Redo the immobiliser switch & connections (again, waiting better weather) 11. Sort out a seperate fuse panel for radio unit, (will need to purchase some new parts - pending funds) 12. Fit replacement O/S seatbelt (I have replacement - the other one has seen better days, again job Pending better weather)
These are just a few of the jobs, some brought forward from last year, still to be completed, no doubt this list will wax and wane. As one can see these are not major jobs as the previous years were mainly planned to get the more imprortant cosmetic and essential basic mechanics sorted out. There is also the funding and the collation of bits and pieces, tools, parts to consider for commencing with the various jobs in-hand. However; there are always times, without exception when problems arise on a job, they do have a habit of biting one in the Ass on the odd occasion, in a twist of fate as we all have experienced this delays us. 2020 was a year of delays and for some, bad events! This year we have the bits and pieces and dealing with the aftermath, at least we can look forward to the warmer weather, it IS going to be a GOOD, POSITIVE one! Yeeeeha! (Ask me again at the end of the year...or next week.)
'Looking Good!
01.01.21
The Positive!
08.02.21 Wow! February already here and today is MOT day and one is trying to find a garage that will fit my Z3 in for the test, telephone rings out at the garage and a few more, even my usual one has not been answering. Most likely down to the lockdown due to Covid, let's us say the opportunity is backward in coming forward it seems. Can only keep trying. It is snowing now so hoping the roads are not going to be blocked....not a good start, low and behold, as I speak, appointment for tomorrow at 12, great! Let's hope all goes well! The Z3 sailed through, so all legal again - Great!
21.03.21 March already and towards the end... where is the time? Hopefully with the promise of the Covid barriers being dropped towards the end of this month, we should be on the path to a near normality. The Z3 needs a good clean and polish, no doubt the battery will need a top-up boost, oil change and further maintenance checks before a trip to the Norfolk region to see family. So there is a growing list of maintenance planned. I also have a replacement O/S seat belt that needs to be fitted as the current one has seen better days. As to the weather, there are signs of Spring, hopefully bringing the warmer weather.
22.04.21 Another month on and not much really going on, the weather is slowly improving and the lockdowns are slowly lifting. However, there is still a risk of a third wave of Covid entering our shores....so there is caution all around, especially with car travel. In the past twelve months I have been pursuing other hobbies and studying towards a number examinations, again restricted by travel. Many jobs on the car to be done, having the inclination to do them is a rut that one needs to climb out of... I have managed to wash the car, so a glimmer of hope and a slow start.
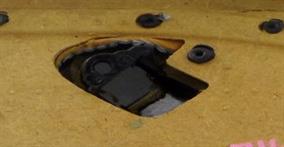
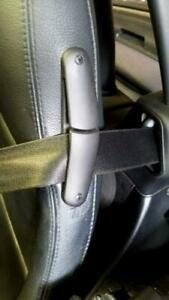
30.04.21 A mixed day today weather-wise and a small opening window of opportunity for me to try a do some maintenance, an attempt to replace the O/S seatbelt, and there is the O/S door handle that had come adrift from the door, so a further repair was required. Both tasks had proven problematic, (this should be considered the norm by now..if you have read my other entries). The seatbelt housing couldn't be removed due to one of the bolts being seized within the housing surrounding the belt bracket, attached to the chassis. The plastic around it didn't leave enough adequate access for tools either. So! I ended up soaking the bolt in WD40. Ideally; the job would have gone better with the removal of the driver's seat, this would have allowed more access to strip the appropriate part of the plastic interior, unfortunately, the weather was not on my side, so the inclination wasn't there, a job for another day where I could dedicate more time on the problem. The door handle on the driver's, (O/S) with the tapered screw thread that attaches into what was a plastic housing' also attached onto the card allowing the door handle to be firm. The broken bracket had made the handle come adrift and required the door card to be removed to get to it, or ideally to be replaced, if I had my way. The problem with these door cards are down to the material they are made from and not forgetting the cost of a the replacement, it was intimidating to say the least, it is like a thermally compressed cardboard, coated in a gloss finish and then covered with the manufacturers choice of interior material. With constant wear and tear of entering and exiting from the car via using the handle, had caused the cardboard to become brittle and over time it had also caused it to split. The only way to rectify this problem was to attempt a repair...
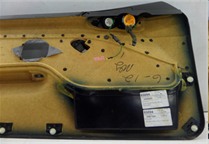
This retaining bracket was made of a plastic that had become brittle and had shattered
The problem I had was on the O/S drivers side belt housing (UK)
example card panel off a z3
Example O/S Door handle
Reverse of Door Card
Mirror Switch
Door Handle
This plastic rivit also helped to retain the door handle
Ref:1
Ref:2
Ref:3
Ref:4
Ref: image 3 shows the plastic heat moulded rivet protruding through the thin piece of card. The narrow part of the card had broken or split across losing the retaining feature or integrity. With the broken plastic bracket and the broken card, this required some ingenuity that would suffice as a semi or permanent repair. Epoxy was good enough to repair the card, once set, this just left the none existent bracket to be replaced and required a flat piece of metal to attach and stretch across the card aperture where the original bracket use to be. With two holes in the metal strip to attach to the card on both sides, two more holes were made to house another two screws into the door handle. Fortunately; the handle was solid enough to house the screws, sort of..., it was like screwing into a soft wood. The handle ended up being firm enough to continue with it's service, for how long, well that is another question...it is good enough for now. Prices to replace the door card vary greatly from £30 to £200+ via the internet, quite ridiculous really for what it is, one can guess how much my particular card was advertised for.....silly money and opportunist by the seller, no doubt.
The next job was for the drivers seat belt to be replaced, a no starter as one of the nuts was too tight and needed to be soaked in WD40 again, so the nut extraction job will be for another day it seems and perhaps this will give me some time to acquire the appropriate hex/star socket. Yes, some will say I already have the socket and I do! Unfortunately, the storage box has a ton of boxes and junk on top of it and will take a day to get to it. Some will know and understand what I mean.... Storage space is a premium and it stops anyone doing anything. It does feel like we go around in circles at times....one has to laugh at one-self at times and say it is just what it is....or earlish senility.
Stock Image
Stock Image
Stock Image
Stock Image
This is what I discovered:
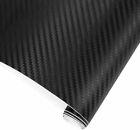
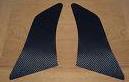
16.07.21 This morning, I decided to take off the nearside stone chip protector, since I had lost the one off the offside whilst travelling down the motorway. The time it took to remove was down to cleaning off the heavy duty sticky tape I had placed underneath as these were purchased, initially as magnetic attachments as to prevent possible loss. Didn't work obviously. These were, in my book not cheap and after a search on the web, I couldn't find anything that was a match or a cheaper substitute. Looking down some eBay listings I did come across black 'D Carbon Fibre Vinyl Car wrap Film Sicker Air Bubble Free' 20cm x 1.52. £6.99 The remaining chip protection magnet was used as a template and when cutout and stuck on the rear lower wings it looked good, probably better the the magnets, this should do the same job, so this problem was solved.
Later in the afternoon: Do you remember the fitting of those cheap chinese spacers I purchased in 2020; well this afternoon I had the most awful scraping, squeaking sounds coming from all over the car, one of those sounds; one can just not pinpoint the source, and totally embarrassing as the sounds, as I travelled down the duel carriageway varied as other drivers rubbernecked. I did manage to get the Z3 back to my garage. Fortunately, I had purchased some better spacers coincidently weeks before; at the beginning of July, as there were indications something was not right and it was more of a gut feeling for the impulse purchase....the spacers were reasonably priced and came in pairs, stainless, were 20mm in thickness, an extra 5mm from the ones I had on the rear. I was hoping it was something to do with the spacers as the problems only started when they were intially fitted, I was comtemplating their suitability at the time.
Today, the weather was 'very' hot, and I think I had had too much sun, no energy, dehydrated and ready to just callapse or lay down and goto sleep, however the job needed to be done and the new spacers needed to go on. I gave the job an hour to complete.
As one can see, from the image these new spacers had a centre ridge, this kit came as a pair with the appropriate extended bolts 'all in'. These spacers and bolts are definately of better quality. When fitting the spacers, they did stay where they were placed and without the risk of falling off the hub; not like the cheap Chinese spacers I had purchased via the internet. The latest design also allowed for the wheel to rest on the ridge without falling to the ground whilst trying to place the wheel back on, as I had experieced with the chinese budget spacers. They could go onto the front hubs as they are an extra 5mm in thinkness, (making them 15mm, if I wanted to use them) and if I have an extra hour to waste trying to get them lined up...putting them on without them spinning like a 'merry-go-round'. (note: some people use bluetack, others use threaded rods without the bolt heads or nuts attached to keep the threads lined up to stop the plate spinning, this does work to a fashion. (however I would recommend the latest purchase). I may go for the newer type for the front later on, I will see how it goes... I will do this in the cooler weather.
I was ready to collapse in the heat and just managed to complete this 'simple job', I pushed on and I did feel the need to test to see if my original diagnostics was correct. It seemed as if this problem had been solved; it will need a longer road run. Today was just not the day and I still needed to to put the tools away, stack up some boxes that had fallen across the garage floor. It was a welcome feeling to get back to the apartment to get rehydrated and to cool off. It had been a long time since I felt this wretched...
eBay - E36, E46, E90, E91, E92 5x120 fits Z3 - 20mm £23.59 (pair) Supplier: accenter 15mm £24.97 (pair) Supplier: jjcraceandrally Note: Shop around and buy British
Vinyl Car wrap Film Sticker Supplier: laichuangdi-maoyi
Cut to shape
25.07.21 After great contemplation, I decided to order some 15mm spacers to replace the cheaper spacers on the front, mainly for quality and second, it was just easier to take off and put back on the wheel without messing with the lining up! So the set-up is 20mm on the back and 15mm on the front, again accompanied with the appropriate bolts, this should sort out any scraping sounds and hopefully even up, any mis-alignment concerning the wheel ratios...as thinking about it; it does in some small way effect the angles in relation to the straight edges being parallel to such items as the dust plates. This may prevent further scraping. I am hoping the 20/15 configuration will do the job, we shall see.
I had noticed when searching for the plates that the 20+mm are less expensive than the 15mm for some strange reason, perhaps 15mm is more popular or the 'sweet' measurement for wheel fitting? This is no doubt where the specialist community forums can be of some help....possibly, perhaps!
17.08.21 A few days ago I received my 15mm spacers and decided to fit them to the front, to replace the cheap Chinese equivalents, a fairly straight forward job, as with it was for the rears. The wheels looked good and it was good to not have to fight or have the hassle of 'juggling the spacer, wheels and bolts all at the same time. When fitted and after a few test drives; I did find I could still hear a scraping sound and this could only be put down to the dust plates rubbing onto the rotors and the hub, so no improvement there. I did research the problem and I found others had suggested the same problems, diagnosis, another suggested it may be down to the brake shim-plates on the back of the brake pads, another possible consideration I hadn't considered. It has only arisen since the 18'' wheels had been put on. I did read somewhere, someone had placed on 19'' wheels onto a Z3. (I assumed the 18'' was the limit for the Z3? ) due to the lack of clearance? (Perhaps someone could clarify that one for me just as a point of interest?) With an extended heavy duty screwdriver, I did push out the dust plates slightly, a small improvement and without solving the problem, so some more work will need to be done on this, but not today.
Putting this one to one side for the time being and looking at my job list, I came to an item that I thought would be more straight forward and to perhaps give me some encouragement above my previous failed attempt, (working on cars is always one pace forward, two back). This new task was to fit an armrest. OK! With a question and exclamation, 'An Armrest? One may well ask....' and made it was also made in China! (You would think one would learn from one's mistakes.... nope! Always up for the challenge). I was considering to purchase the official BMW double cup/bottle holder; until I saw the price (£89+) and I questioned the logic and tried to justify spending such an amount on a bit of plastic, (as always, finance is always a head leveller) Hence; deciding on the armrest instead as it was much cheaper. This also had a cup/bottle holder built in at the rear, an ashtray and within a pulldown lid, the size of the bottle retainer adjusts to the size of the bottle inserted; as the lid pulls down an aperture opens accordingly to grip the inserted cup/bottle. This component seemed to be more for the 'buck'!
In addition, or a bonus, this armrest does have at least five USB sockets built in, with two power usb feed portals making the total of 7 and with other USB portals installed around the car, so far totals 12, (some may say this is an overkill to say the least, perhaps!) Either way two USB ports would be redundant if I had used the supplied USB lead for the live supply from the radio or media player to the armrest unit. I decided to solder an extra couple of wires to the enclosed circuit board within the armrest, melting a small hole using the soldering iron, through to the bottom and at the rear of the armrest case; very
One must also add, there is room for a standard water bottle at the rear of the armrest, there is also an ashtray, this may be used as a utility storage for spare fuses or screws based on personal preferences, as for the location is really considered as impracticable within the Z3, to use it as it was designed for.. however there is always the original ashtray fixture to the front of the centre console for those that want to remain old school... There is still access to the rear heated window and softtop switches within the rear centre console. The armrest does slide forward if one requires extra room to access these and the upper armrest can be detached fully by pushing fully forward when required, (based on how one has installed the buffer plate) this can be decided as and when one first re-constructs the unit from purchase. With the buffer at the rear, this allows the armrest to slide fully forward and off the retaining plate with a little persuasion, this is preferable. With the Z3 there is little to no travel of the armrest to the rear once fitted and therefore not enough room to detach the armrest when having the buffer at the rear. (even though this is preferred). (Note: There is not really enough natural inertia in my opinion; for the arm rest to travel forward and is restricted by friction and therefore, no real risk of the armrest shooting forward and off the plate accidentally without deliberately causing it to do so, even during driving).
There are also internal LED lights, a nice touch and illuminates the compartment adequately, useful at night and it works via two AAA batteries, (not sure why this couldn't be included within the ignition circuit, perhaps something to look at, at a later date, maybe down to voltage. The battery compartment, is covered with a 'clip-in' plastic cover and hides the batteries. There is a top tray, (designed for resting a mobile phone on top, offering for easy and quick access). In addition at the front of the tray, (not clearly illustrated within the image above) there is a further design feature to house an assortment of spare coins, without having the coins moving about during driving. The whole tray pulls up and out manually and is not hinged, allowing for further flexibility, this also allows for access to the lower storage area.
Another Note: When driving and changing manual gears, one will need to be aware of at least least to adjusting one's method or technique. in changing gear, mainly to allow for the angle and positioning of the arm rest. This shouldn't really interfere or be a hazard to your normal driving experience, again down to personal preferences and style of driving.
If one considers losing the bridge that houses the slider and armrest and just bolting the slide tray, after drilling a couple holes within the armrest directly to the centre console, this could lower the armrest further; to your preference and losing access to any lower BMW factory built in tray, towards the switches on the rear, an alternative and just a passing thought.....
click for full description of armrest kit and further information and images
near to the cup/bottle holder. The wire was fed down and through the centre console to eventually be connected to an ignition live terminal, with a separate inline fuse, this added an additional safety; preventing any possible live overload. The USB patch lead supplied, would also have needed to be stretched right across from the armrest socket to my media player, (note: not all media players will have a USB port) and this would have required the cable to stretch across where the gear stick was situated; with the risk of the lead getting caught up on the gear stick when changing gear. With the inline feed; going under and through the centre console, circumvented this potential problem.