09th January 2016 - Condensation in Tail light Today the weather had improved, so I ventured out to check out the RX8 and noticed condensation in the back O/S, (drivers side) tail light, reading through a number of forums and views of some of the Youtube videos, I discovered that it is a common problem. with this model. This was my first job, detach and dismantle the light unit. The light unit is held on and in by 2 bolts (10mm), however you do need to prise open around 5 push-in studs, (these can be brittle, so be careful not to break them) on the carpet panel and unscrew a further two bolts as the unit has what can be described as a shield plate, reasonably straight forward. I also observed the wire connectors connecting to the bulb, can be detached independantly from each of the bulb holders, this means you don't need to take the bulb holders out, this makes the job easier, especially when reinstalling the unit..
On inspection, there was a small amount of water within the unit, probably only a thimble full, unfortunately this was enough to cause a large amount of condensation.. Checking the rubber gasket, it didn't seem too bad and no real need to replace it at this point. The gasket had just come away from the socket points in some parts of the unit.
By using a hair dryer (yes, I do have one, weird really, as I don't have much hair, joking aside, I purchased it for this type of job where a heat gun or hair dryer is needed and best to carry out the job indoors).
There is no really access to the unit other than through the bulb appertures, by sealing all the holes with a thick cloth, except one hole where the heat can enter the unit, the directed heat will heat up the unit and eventualy dry it out. (one tip, drain all of the water out first otherwise you will be there for weeks). Patience is important as it will take a good half hour to an hour to dry the unit. I decided to glue the gasket onto the unit (The gasket normally uses a sticky pad and this had dried out over time. I also glued around the unit just in case there were minute micro fractures within the casing to be on the safe side.
Before reinstalling, the unit, it is always a good idea to clean and dry the bodywork around the light unit apperture and then reinstall it in reverse order as it was taken out. This is where the detachable connectors are useful as the reconnecting of plugs can be a little on the tight side, especially on the extreme right of the unit as you view from the rear to front of the vehicle. I also experienced the bulb popping out of the sockets and falling into the unit a few times, requiring me to disconnect and recoonect the plugs a number of times, before bolting up the unit. I will give it a couple of days to see if it has cured the problem. The lights worked fine.
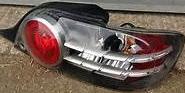
fig: Light Unit - Gasket unglued from fitting - use silicon or a glue to stick it down onto the unit...
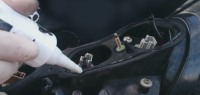
fig: Rear N/S Ineteriror Boot Attached Fitting - note: - how tight access to bulbs and size of apperture
fig: Rear O/S Light Best to dry the unit indoors with a heair dryer
fig: Glue can be used or silicon top and/or botton of gasket to help with seal