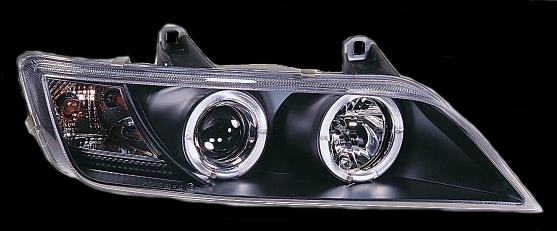
REPLACEMENT of Headlight Bulbs and Install Angel Eyes
Like most cars I have had, I have tried to improve night vision on the roads and the Z3 is no exception. I like to have the ice white glow rather than the amber , dull beam. I have already a set of Angel Eyes, originally to replace those on the E39 and have remained in the box for 6 months or more.....(pending)
BMW Angel Eyes Kits vary per model and can cost from eBay: £18 to £40
Seller information Varies
Even though I have an Angel Eye kit, I found the current headlamps awkward to open up without causing damage and the risk of damaging the anti-weather element. One could use the oven method to soften the sealant before dismantling the front lens, if one had the inclination...currently, I don't, however this may change....I will include it on this page when I do...
I decided to go with just changing the bulbs to give the lamps a better and stronger white light.
Note: (UK Right hand drive model) To get to the passenger side headlamp, one needs to unscrew the retaining nut on the filter box and lift the airbox filter, towards the back and to the right hand side or the right, (nearside) wing of the engine compartment, this can be time consuming and awkward, especially for those unfamiliar with this process. However; this is necessary to get to the bulb without having to take out the headlight unit. Once the air filter box has been lifted or pushed to one side and retained out of the way, (I used the back of my right arm just to stop the box springing back) one will see a plastic cover, (near the radiator) now this is unique to the passenger side. There is a plastic moulded clip that hooks on to the top and can be manipulated open, (this can be missed). There are also two lugs on the plastic cover at the bottom that can also pull out. On mine it was quite flimsy and clicked open easily. Inside is a tight space, it is good if you have a small hand. (I don't...) On finding the bulb, one can turn it 90 degrees and the bulb will come away. One can proceed to do the same to the remaining bulbs. On replacing the bulbs, one can replace the plastic cover and allow the filter box to spring back to it's normal position, not forgetting to tighten the retaining bolt on the filter box to stop it moving around during transit.
The drivers side, (UK offside) is more straight forward and conventional, a 90 degree turn and the bulbs should just twist out. Again the working space behind the headlight unit is tight and to release the bulb from the wire connector, one needs to use a small screwdriver or an interior plastic prise tool to help with the unclipping of the 'L' shape bulb segment from wire harness. (Note: over time the plastic lugs on any of the components can become brittle, so be careful.
Some bulbs are designed with a particular lip that screws into the bulb housing and this is down to the manufacturers regulating the correct bulb wattage and illumination. In desperate times, where one finds a bulb that does not fit, one can file these lips lightly and they should then fit in and turn correctly within the bulb housing. The headlights just then needs to be tested by switching on the low/high beams. Warning: The latter method requires one to consider other road users at night. If this method is used, one would suggest only using higher rated bulbs on high beam only, unless recommended by the manufacturers of the product.
<6>
See Purchase Index for: BMW Z3 1996-2002 BLACK PAIR PROJECTOR LED HALO ANGEL EYE HEADLIGHTS E MARKED for an alternative to just adding rings.
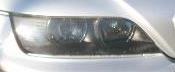
Original
Replacement
Powered by S-AM3l1A
Note: One recommends reading the diary first and then linking to workshop notes to maintain the continuity of the theme...