Note: Many Thanks to Vinci on BimmerForums.com - I have also added my bit from my perspective...
Note: There shouldn't be any need to disconnect straps with this particular model of chair as long as the material flaps are accessible and they are not attached to the skin. There should also be a shield over the rear upright padding that firms the rear of the chair and this can be unclipped if necessary, however there is, again no need to do this on this model. In many ways the smooth backing of the shield can aid in the removal of the skin and not cause a restriction as with trying to lift the skin from the raw upright padding.
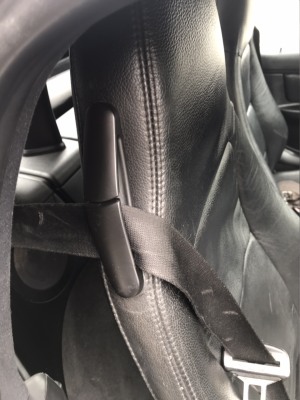
How to fix your broken seat belt guides.
Like many Z3 owners, my seat belt guide was not brittle or cracked or even fallen apart; it was missing. I bought a new one from eBay, the supplier was based in Latvia, if I recall. With the O/S, (driver's seat) missing, thinking "No big deal, how much can a little part like that cost?" (you may wish to hold your breath now) With today's market prices they can cost around £25, (eBay) and this is just for one side. More likely double the cost if you are buying from a BMW Supplier. They will also cost you in time, around the two hours if the job is done right and that includes extracting and refitting the chair to the car.
After many weeks of having to fish the seat belt out from behind the chair, I decided it was time to make it right and also, it was part of the renovation.
Required tools:
13mm socket 16mm socket 16mm combination wrench Large slotted screwdriver Small slotted screwdriver Needle-nose pliers Diagonal cutters Large towel(s)
The first tasks initially is to remove the chair to be worked on from inside of the vehicle, removing the chair is not too difficult, but can be a lot easier with a second set of hands, mainly to help you lift it out of the vehicle. Note: there is no need to remove the lower seatbelt connection if working on the seat in close vicinity of the vehicle. The seatbelt will stretch... WARNING: Do not put the key into the ignition with either of the 2 seats out of the car. If the airbag sensor connectors are disconnected when the ignition is turned on, the airbag light may come on. This normally, cannot be reset without an airbag reset tool. The visit to the BMW dealership will be expensive.
A. Cover the door sill, centre console and anything else that you might bump into with something protective like a dust sheet or blanket. This will help prevent collateral damage to your interior while you are wrestling with the seat inside and out of the car. B. Slide the seat back to expose the two nuts on the studs holding the front of the chair brackets. C. Using a 13mm socket, loosen and remove the nuts. D. Slide the seat all the way forward and fold the seat back or forward, if it will go. This can be done by using the motion motor switch on the side of the chair. E. Using a 16mm socket, loosen and remove the two rear bolts. (This can be tight and awkward in a two seater, especially if trying to use a standard socket wrench). F. Using a 16mm combination wrench, (and for those wishing to remove the seatbelt) remove the seat belt from it's mount on the seat. (note: on some Z3 models the bolt may be welded and may need a breaker bar to crack the nut). G. Disconnect the wiring harness from under the seat. There is usually a yellow coloured wiring module that is easily unclipped. Check there are no other wires, such as, the seat heater connectors these will need to be removed also. Take your time with all of the connectors and never pull them apart by pulling on the wires. It helps to tip the seat forward or to the side while disconnecting. H. This is where an extra set of hands can come in handy. Carefully lift the seat off the front studs and then out of the car. I found it to be easiest to do this with the seat back fully reclined, (that's if the chair upright reclines!) and to the side. This can be done solo at a pinch. I personally did this by myself and one does not have to be strong, however it can always help.Take your time. It is very easy to scratch things with the seat brackets while removing the seat, (hence the dust sheet or blanket). I. Take the seat someplace where you can lay the seat out without damaging the leather, (again; the dustsheet or blanket could fulfil this function).
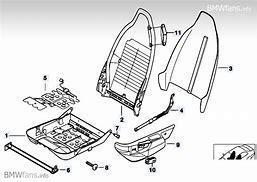
Note: there are different designs of chair for the BMW Z3 here are two examples:
A
B
The following or the first description is for chair A: I. Disassemble the seat A. You will notice there are no plugs on the back of Chair 'A' and only requires the back cover material or skin to be unclipped from the back and then passed through to the front of the chair.
Remove Plastic Plugs
5..
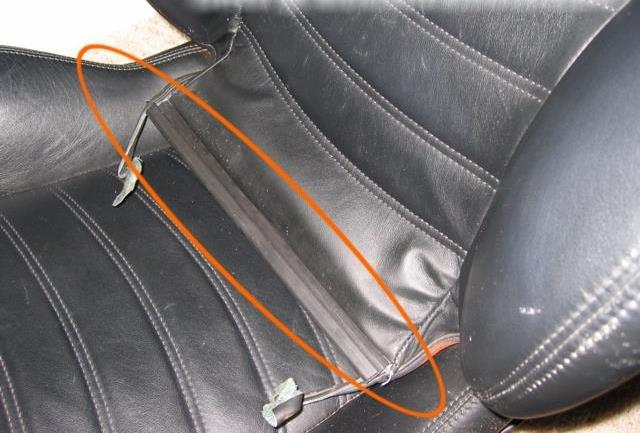
<<< You can unhook the two sides by reaching under the plastic channel at the two corners at the bottom of the chair and rolling the plastic strip downwards and out of the channel as described visually, in fig. 1.
Now, slide up the material until it is off the rear back upright.
With the skin off of the upright of the chair, you can get to the snap-rings or star retaining washers that hold what's left of your seat belt guides, if any, onto the skin. Use a screwdriver and/or pliers to pull the snap-rings or star retaining washers off the broken or damaged clip posts that go through the holes in the seat skin.
6.
7.
This model of seat 'A' is in my 2002 BMW Z3 2.2i and I needed to replace the seatbelt clip on the driver's chair (O/S). In comparison to the Chair 'B' (pg 16) the 'A' chair disassembly is much easier.
1.
2.
My chair does not have these ties on each side...
3.
<<< Once the flap has been exposed one can proceed to unclip the back of the chair by hand, (a plastic priser can be used if needed, gently, however I preferred to use my hands to prise them apart). Starting from the bottom of the chair and working up towards the headrest.
Once completed, the skin should be gently pulled slightly apart and upwards and off. Go slowly as there may be a staple or two towards the base of the chair. If they are fastened, gently prise them open and continue to lift the skin. Again; it really depends on the model of the chair, whether it has been previously disassembled before, or whether one comes across the odd fastenings from the previous owner. In my case there were two staple type fastenings at the left and right of the lower part of the chair. (On reassembly, I decided to leave them unfastened as the plastic runner clips held the material together firmly.
4.
5.
B
A
Gently pull apart from the centre, both sides. Start from the bottom and work up
Snap rings or Star retaining Washers
posts
This inside plastic strip may not be needed. As some skins have ones sewn in.. >>>
Note: Position and the angle direction when fitting
Another job done!
26.04.19 BMW Z3 2.2i 2002
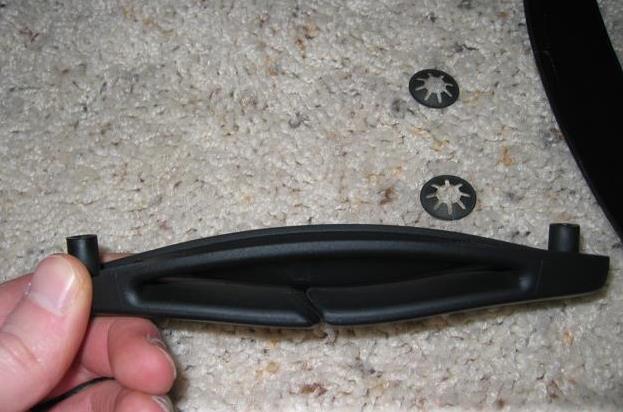
Note: 1. Poke the posts through the holes in the skin from the outside in.
2. Inside skin, place star retainers onto posts, make sure they are very secure. can be awkward
3.Place Skin back onto the back of the upright of chair & Fasten...
Job Done!
Subnote: I ended up taking the chair out two or three time to get this right, so don't feel too bad!
1.
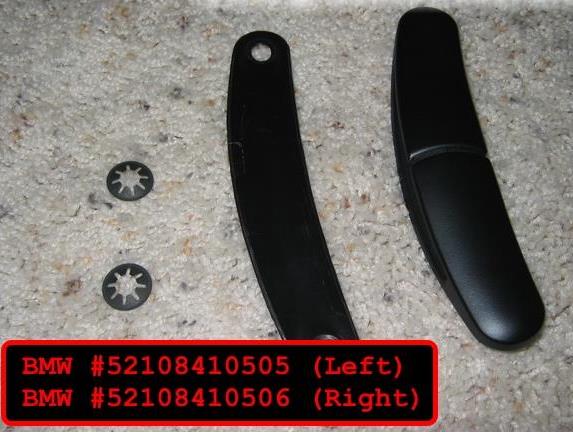
In replacing the guides with new ones, they usually come with the star retaining washers or equivalent, (they are usually taped onto the new ones). You will need to feed the two posts through the existing two small holes in the skin, (where the previous clip used to be attached) you may require a screwdriver, pliers and possibly a small hammer to fix on the washers from the inside of the skin, (again this can be awkward) and then make sure the clips are secure. If the washers do not go over the posts, slightly bend each of the segments of the star, just a fraction at a time, don't rush, until it just about scrapes the side of the posts, bearing in mind they should be a tight fit and should not allow the washer to be retracted. Make sure the washer is as far down on the post as possible and is retaining the clip on the other side of the skin.
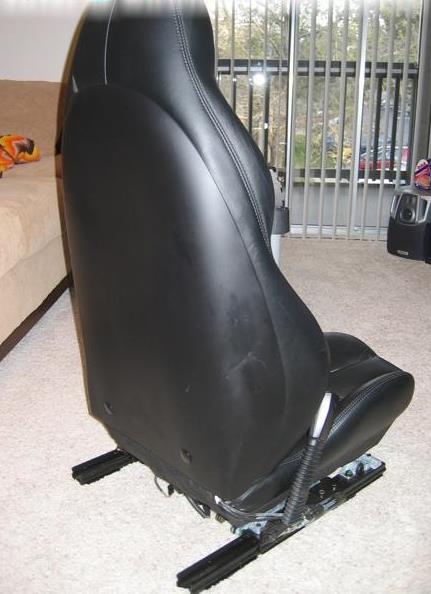
Reassemble the seat by pulling the skin back on and over the rear back upright. Make sure to get all of the material hooked back to the frame; it should just click back together. (can be quite satisfying). Everything else just goes in reverse of how you took it apart.
5.
6.
7.
When putting the seats back in the car, (now the real work starts) make sure that you bundle the wires up so they don't interfere with the movement of the seat and one suggests you connect them at this stage, ( I found it easier to connect the electrics with the chair half in and half out of the vehicle. (especially if doing this job on your own or without help, be careful with the chair guides and try not to activate the electrics before the chair has been bolted down).
Once the chair is in and fixed onto the floor bolts, (front) tighten the front nuts and proceed to forward the seat as to access the rear bolt holes. Note: One may find the holes are not lining up. (This may be due to the manhandling of the chair and the rails have slightly warped or the seat motors have been operated when the chair has been unbolted or not anchored and the chair has adjusted itself, the length of the rail on one side has most likely misaligned and the bolt holes are not lining up. It could be one of many reasons or all of them....
It is a case of trial and error to correct the problem and to get the bolts in and tightened. (I found this was more time consuming than doing the belt clip fix).
In this situation it is best to undo all of the bolts, however not disconnect them initially, then try to make the relevant adjustments until the rail length is equal on both sides of the chair. This should take out the stress within the rails and the bolts should align up with the holes where applicable and then the nuts and bolts can be tightened up easily. (given the space to work in). Failing that the chair will need to be taken back out to adjust each of the rails by unbolting them and adjusting them manually. (be warned, this can be time consuming). Once adjusted, reinsert the chair into the vehicle and bolt down...
Now check the movement of the chair using the motion forward and back on you chair by using your chair motion switch. Full movement should be attained, if not, the rails will require further adjustments or the bolts at the rear are not fully screwed in. The latter will also restrict the full movement to the rear).
That pretty much covers it. If you haven't done this before, make sure you set aside a couple hours to do it. Also, remember that you cannot drive the car until both seats are done, (remember the airbag sensors).
<15>
Powered by S-AM3l1A
Note: One recommends reading the diary first and then linking to workshop notes to maintain the continuity of the theme...