One should check your brake rotors with every major service that you perform on your BMW Z3. Inspect your brake rotors for cracks, scoring or replace if you have a pulsation when braking. Brake rotors can look OK and still be worn out. If there is a ridge around the edge of the brake rotor, this is a good sign that they are worn out. Measure brake rotor thickness using a micrometer to determine if they need replacing. When measuring, measure in a few different spots and use lowest number.
Keep in mind that when your car was serviced before, parts may have been replaced with different size fasteners used in the replacement. The sizes of the nuts and bolts may be different from what you have, so be prepared with different size sockets and wrenches/spanners. Protect your eyes, hands and body from fluids, dust and debris while working on your vehicle. If working with the electrical system, disconnect the battery before beginning the job. Always catch fluids in appropriate containers and properly dispose of any fluid waste. Recycle parts, packaging and fluids where possible. Do not work on your vehicle if you feel the task is beyond your ability.
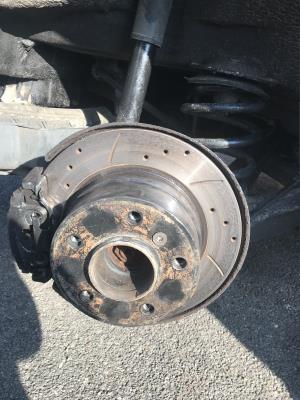
Vehicle models change and evolve as they grow older, so the vehicle shown in this illustration may vary slightly from yours. Questions or want to add to the article? Leave a comment via email.
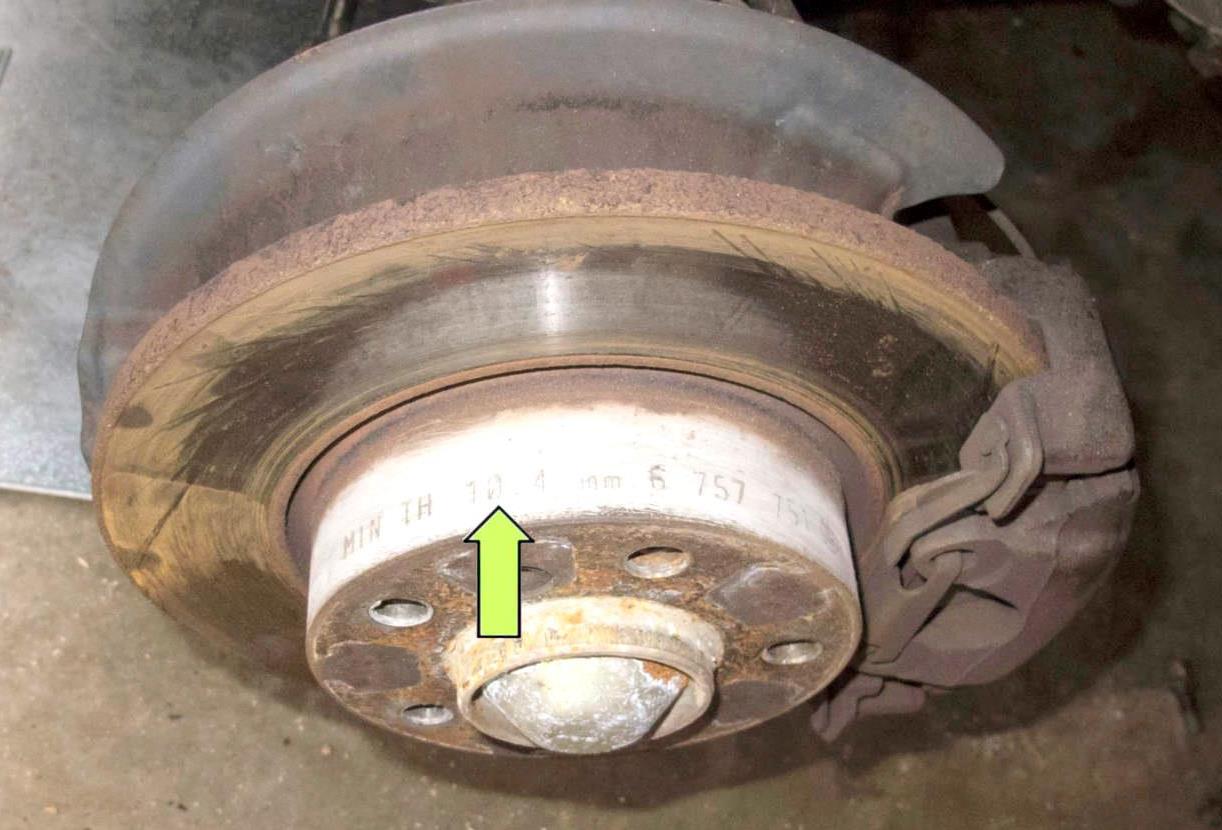
Most factory rotors and some aftermarket rotors will have a minimum thickness stamped on the rotor. This will be in area of hat or hub flange. Clean rust away from rotor to uncover specs. There may also be a part number. See your Service manual on disc brake specifications for all Z3 model brake specifications. It's a good idea to inspect and replace your brake pads when replacing brake rotors. Always replace brake rotors in pairs by the axle. With the vehicle on the ground, loosen each wheel/Hex or Star stud about 1/2 turn. This will help with removing them once the vehicle is on it's jacks . Once the car has been lifted, support with axle stands. Remove the wheels from the axle you are replacing the brake pads and brake rotors on.
I decided to rub down my brake dust shields; to get off some of the built up rust and then painted them with a black antirust solution and proceed to use 'Hammerite' paint, around 'the top hat' of the rotors. This was mainly to prevent the rust coming through and making the wheels unsightly; as they do after a period of time.e.g.
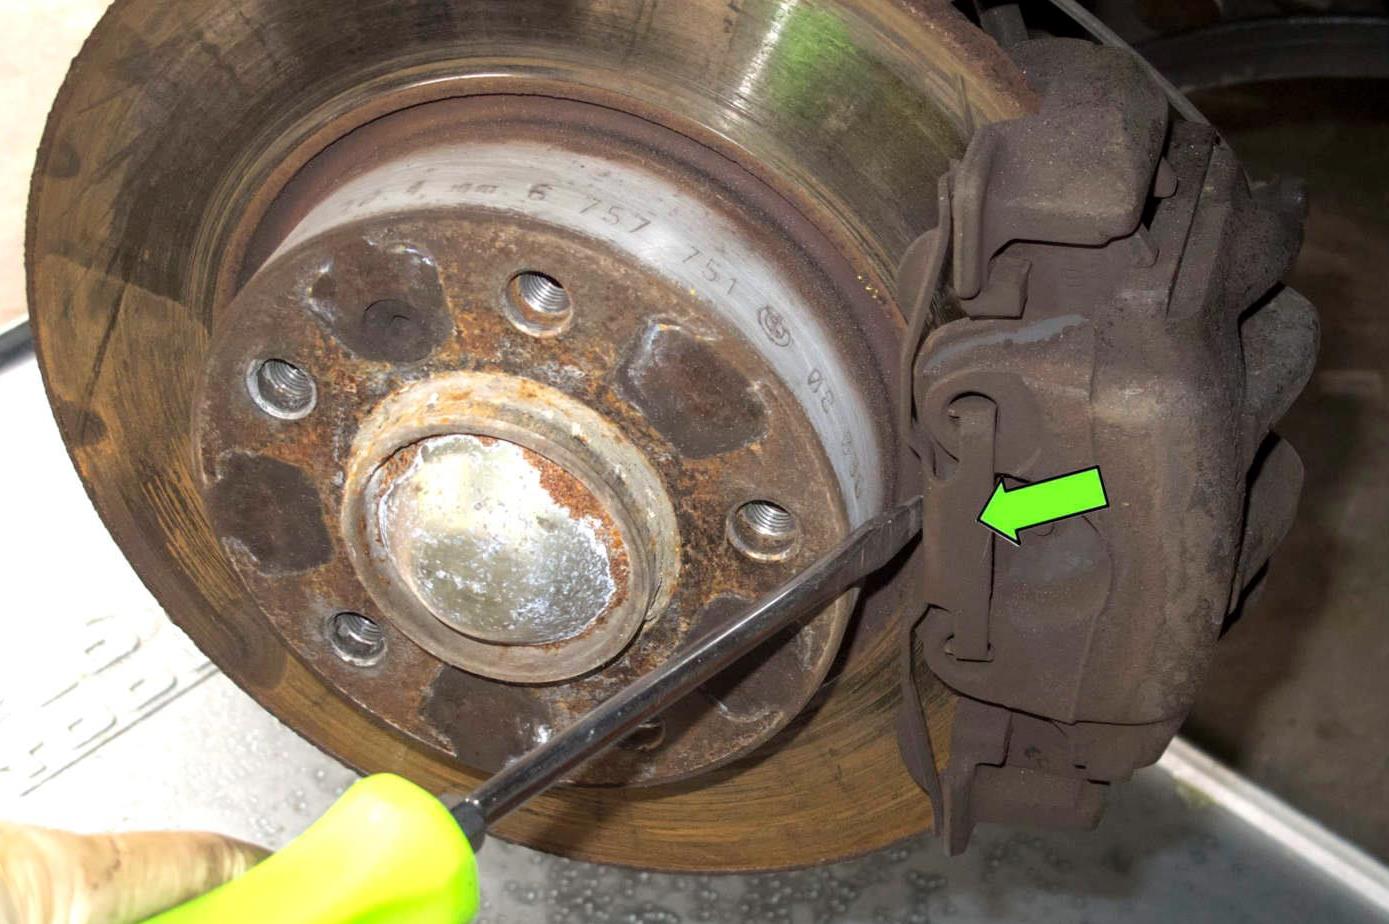
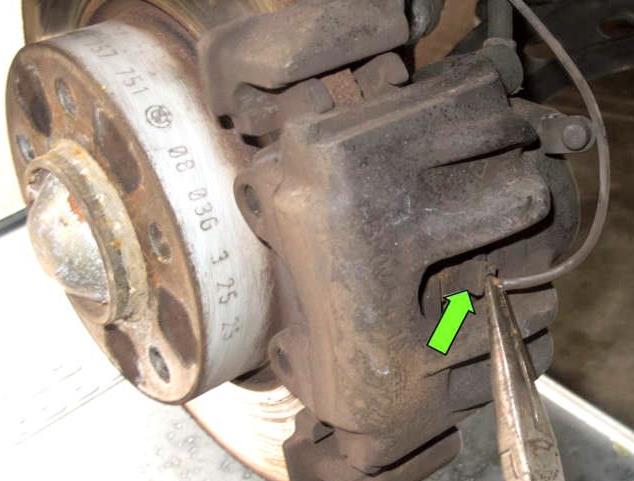
Using a flathead screwdriver, remove the brake caliper anti-rattle spring, (green arrow) by prying out while securing with hand or with some long nosed pliers. The spring can pop off and go flying, be sure to hold it steady and one may want to use gloves and eye protection.
Again, after a rubdown with an abrasive paper, one may also want to rub down the caliper, cradle and spring, coat them with a primer and spray them with an appropriate coloured paint. The caliper will require a 'high temperature paint. This will help to protect them from dirt, grime and also rust.
Pull off brake pad wear sensor, (green arrow) out of brake pad and caliper, (Sensor on near - passenger side UK) . Be very careful as sensors tends to break during removal. (The metal clip on the sensor can shoot out and lost) I like to use a pair of needle nose pliers to pull the sensors out, being careful to retain the metal clip, this is an important component of the sensor for it to work correctly.
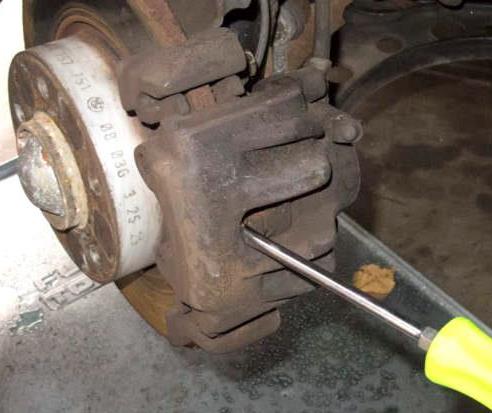
Using a flathead screwdriver, slowly press brake caliper piston in. This allows the brake caliper to be pulled off the brake rotor easily. I like to pry between the outer brake pad and brake rotor. This way there is less chance of damaging the caliper piston and the face of the rotor, (if using it again). Forcing the piston back into the caliper will cause the brake fluid in the reservoir to rise. Be prepared to remove some fluid or to have some rag available for any overspills.
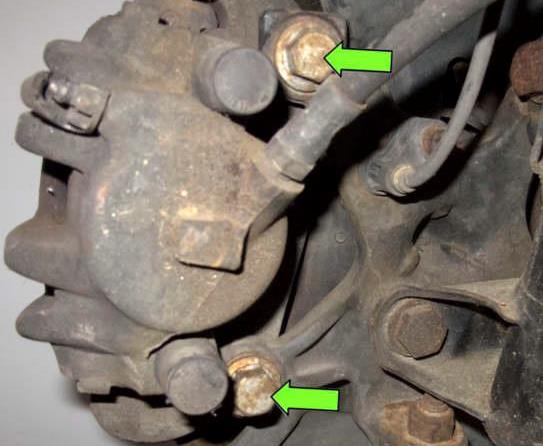
Working behind the brake caliper. Remove two 18mm, (rear rotor is 16mm) brake pad carrier bracket mounting bolts, (green arrows). Remove the brake caliper and hang the caliper using a piece of metal coat hanger, rope or bungee clip. Do not allow caliper to hang from brake hose as the weight of the caliper can cause the rubber pipe to split and leak and a replacement will be required.
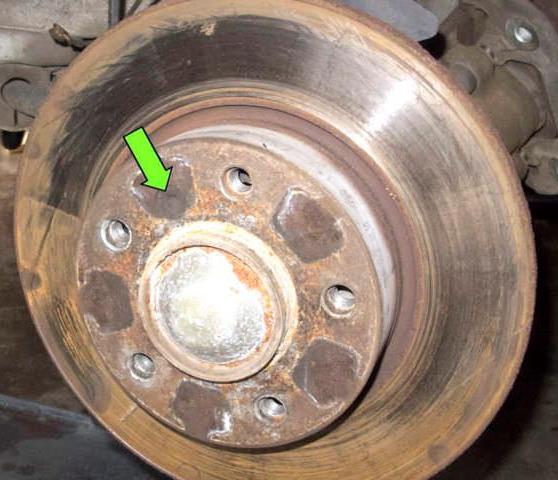
Next, using a 6mm Allen bit, remove brake rotor mounting fastener or Hex screw/bolt. (green arrow) Then remove brake rotor from hub. The rotor might be stuck; so be prepared to give it a few taps with a mallet. If you are replacing the rear rotor make sure the parking brake is off before trying to remove the rotor.
In my case, on the front hub, the hex screw was stuck solid. One can use a penetrating oil such as WD40, failing that a hot torch could also do the trick or the combination of using both methods. Sometimes even when both fails, it remains to drill out the Hex Screw. One should start off with a thin drill bit to establish the hole. This also helps with keeping the screw thread in tact (if reusing the rotor). One continues with the next size up drill, until the Hex Screw shows signs of movement and extraction can be made. A new replacement Hex Screw will be required for the new or existing Rotor Plate.
Methods of extracting a stubborn Hex Bolt: 1. Use the correct Hex Key and clean out the Hex bolt head of debris. 2. One can Drill them out 3. Chisel them out, (with hammer and cold chisel) this method proved a great success for me with removing mine.. I preferred this method) 4. Use an impact driver, (Electric, air, or manual) 5. Use a spring centre punch 6. Replace the wheel hub totally, (not normally necessary, very extreme).
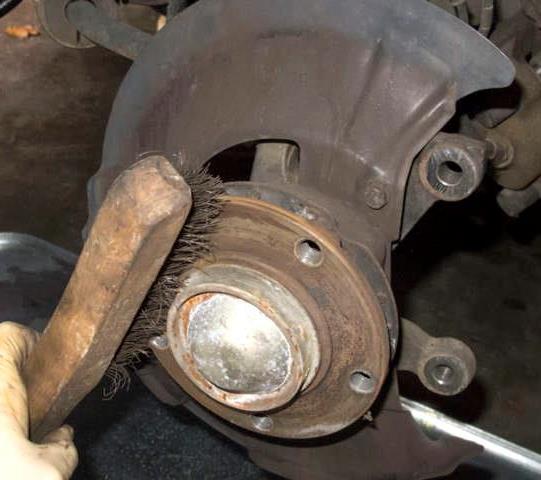
Clean wheel hub using a wire brush. Remove all corrosion and rust from hub, one may want to repaint the dust shield before installing the new rotor. Install new brake rotor and tighten mounting fasteners. Then reinstall brake caliper, (check first, that they don't need new components or one needs to fully replace both calipers, also check nipples and pipes). When satisfied with inspection, tighten bracket mounting bolts. Once calipers are installed and fasteners are tight, (One can sometimes get away with not having to bleed the brakes. First, press brake pedal to pump up the brakes gently. Once brake pedal is hard to push, allow the nipple to be tightened, mount the wheels and check brake operation. If OK! Move onto the next...
Before installing my new brake calipers, I decided to paint them using a special paint for high temperatures, this should aid in protecting the brake caliper and it should also look good.
Generally, while the wheel, caliper and rotor(s) are off, it may be a good opportunity to check all components dust plate, replace with new hex screws, bleed nipples, (if corroded) and check the Caliper plunger, rubbers for wear or excessive rust and also the brake pipes attached to the caliper that may inhibit the brake system's effectiveness. Any defective components should be replaced, if only to give peace of mind and security to you, your passengers as well as safety to other road users. It is also an MOT requirement for all brakes to be fully functional.
Replacements Front Plates
After close inspection of my front brake calipers, I decided to replace both front calipers; the rust had eaten away around the plunger and the seals and looked in very poor condition. In some cases the plunger can seize due to the corrosion build up, making them inoperable and dangerous. The bleed nipples had also seen better days. It is easy to break the bleed nipple when opening them up to bleed the braking system, especially if they have not been maintained for a long period of time. The following methods could also help when working with the braking system, and stubborn Hex Screws.
e.g. Rear
e.g. Rear
e.g. Rear
e.g. Rear
e.g. Rear
e.g. Rear
see diary entry for 15.02.19 discussing the actual job
Update: The front discs and brake calipers have now been fitted, see diary for explanation dated 15.02.19. Today with camera in hand in 29th March 2019 and after around a two hundred mile trip the performance has proved positive, well in the product at least.... (See diary 29.03.19)
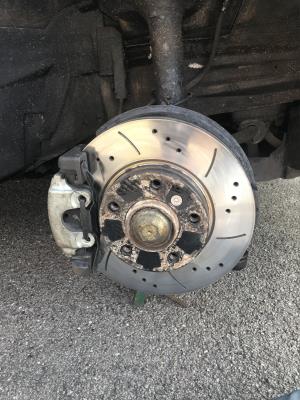
Front O/S Brake Rotor with repainted small 'top hat', spring, pad carrier, caliper and replacement Hex Screw/bolt and dust plate...
Rear O/S Brake Rotor with repainted 'top hat', spring, pad carrier, caliper, dust plate, new Hex bolt...
Note: The 'top hat's' have been painted with grey Hammerite F/R. Front Caliper with Silver/Chrome high temperature paint, Pad Cradle, spring, dust plate with anti-rust treatment/primer. Rear Caliper with black anti-rust treatment/primer. A later update a repaint to of rear to silver to match the front. Adding of new wheel nut caps' Used anti-rust bolts when possible.
(Note: one would suggest loosening the cap on the brake fluid reservoir before starting maintenance on the braking system, this will become more apparent during the pushing back the pistons on the caliper).
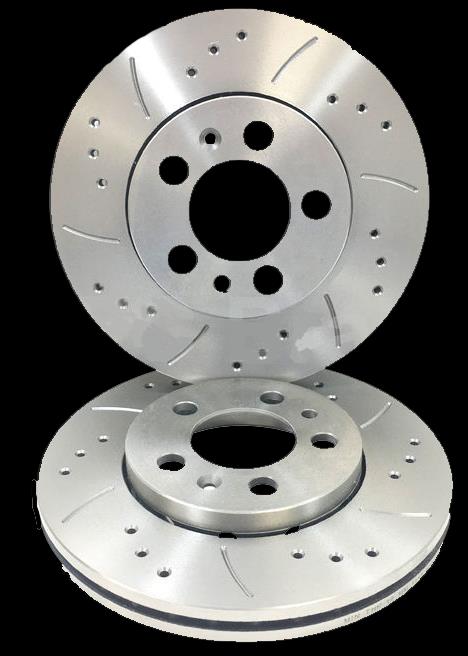
NEW ROTORS REQUIRE CLEANING
New rotors are coated in an oil to preserve the metal surface from going rusty during storage. They are also delivered with the same conditioning and therefore require degreasing using a correct degreasing agent. This is an important process before use, for the brake pads to work correctly and safely.
Requirement for UK MOT
Working on rear brakes - Make Sure your Handbrake is OFF and wheels are chocked. Use chocks on the wheel(s) to prevent the vehicle rolling and also place the vehicle into gear as a further preventative measure.
Powered by S-AM3l1A
<10>
Note: One recommends reading the diary first and then linking to workshop notes to maintain the continuity of the theme...