© Copyright Reserved - United Kingdom
Ideal Screen Composition 1024 x 768
A free template by Lucknowwebs.com for WYSIWYG WebBuilder 8
5 Series Beamer
Diary of a Second Hand 15 year old Beamer (Maintenance - Battery Drain included...,
BMW E39 520i year 2000 Engine 1995cc)
M Series.
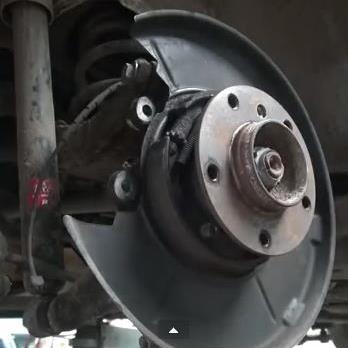
fig. Boot - Rear Fuse Cluster
Emergency or Parking Brake - (Hand brake)
On buying the Beamer I did notice on the MOT a precautionary note suggesting the Parking or Emergency Brake had low effectiveness percentage more noticable was rolling down the hills with the handbrake on when parked, a total give-away really.
Note: There are two sets of brakes on the rear of an E39, shoes 1/3rd the size of the standard shoe, this is housed within the wheel drum. The replacement shoes, (eBay £23 set of four) and also used on the BMW ‘Cabrio Alpina’ for the parking brake and standard BMW brake pads for the 520i are generally used, my pads seemed ok and were not replaced at this time.
In addition to the replacement shoes I decided to re-under seal the car, as the wheels were off, messy job.
Replacing the rotors will be for another day, (seems to be an American past-time to replace parts when there is no immediate need for them and visa-versa for the parts that are urgently required) the present ones have some life in them and obviously, will be replaced when needed and finance allows.
With one job outstanding, I decided to check on the 'Emergency' brakes or 'Parking' brake (UK). My first job was to chock the wheels to stop the car moving, the car was jacked up and two standing jacks placed under the car at two jacking points, the car lowered onto them and then with the handbrake off, (this allows the rear wheels to move freely on the jacks). If this is not done, the drums will simply not come off, as the shoes bind to the drum, therefore not allowing the access to the brakeshoes. After taking off the drum, stripping down the rear brake assembly, I found the one 'self' adjuster was on the wrong way round, (weird) this was corrected and the fairly worn shoes were replaced. It is also advisable at this point to grease the adjusters for a more free movement making sure the grease does not touch the inside of the drum, brake pads and shoes. (otherwise this will make the brakes ineffective). It is also advisable to check and clean the debris from the brake assembly and rubber, using a wire brush for metalwork and a clean damp cloth for the rubber and inside of drum lining. (You may want to use protective disposable mouth/nose mask for this).
Many forget to adjust the handbrake allowing for three notches, (just pull up the handbrake by three clicks after replacing the drum), without this adjustment any further adjustment on the brake adjuster may stop the wheel from moving around. Adjust the wheel enough to get the drum on, the remaining adjustment will need to be done by using a screwdriver through the aligned bolt hole in the wheel hub. Align and click Up to close the distance of the shoe to hub to the point of the wheel not turning. With the wheel re-attached, by clicking the handbrake off, (from those three clicks) allows the wheel to rotate as it should, any further adjustements can be made at the handbrake with cable adjustments. Again, without the three click adjusment the wheel will bind, not rotate or move and therefore, the car will not move, the wheel and hub will have to be removed again to be re-adjusted to allow the wheels to turn. This can be a Homer Simpson moment, funny and frustrating at the same time, if this procedure is not followed.
This job did take some time and was not straight forward as there were problems with pad retaining bolts, spring attachments and adjustments, like all the jobs on this vehicle so far, it required more work...fortunately all working now.


fig. Source - Brake Caliper Pads and Rotor
fig. Source - Parking Brake Shoes
Brake adjuster
Contents Page
15
14
Workshop
Alpina Shoes A.B.S
AR Spares Dist. Ltd Mick's Garage £24.48
Note: If not sure of the brake shoe layout draw a diagram or use a smartphone camera, better still, a service manual, mentally note the method and order of dismantle and when replaced shoes reassemble in reverse order. With practice the spring and retaining pins and clips will fit into place easily.
Tools: I prefer to use long nose/pin pliers and flatblade screwdriver for this.
DO check the brake fluid levels on completion of task
Workshop/Diary - Handbrake
16
Contents Page
click