Diary of a Second Hand 17 year old Beamer (Maintenance - Battery Drain included..., BMW E39 520i year 2000 Engine 1995cc) M Series.
Workshop/Diary - Adjusting or Replacing Parking/Emergency/Hand Brake
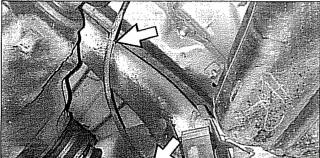
fig.Source - Handbrake Leaver
I moved onto the O/S hub, stripped the brake mechanism down, cleaned, re-greased and put it back together again, adjusting the brake shoes, checked for wear, not much, as they were only put on later previous year, so adjusted the brakes enough to beable to just get the hub back on. (Note the handbrake should be on at least three clicks before the hub is replaced). I did exactly the same with the n/s brake hub. (Note: when stripping down the handbrake inside the car, I had unbolted the actual handbrake and taken off the small nuts that were on the cable adjusters. Putting them back was time consumming, however I did notice there was a change in the length of the cable - it seems to have reduced considerably, even when tightening up the adjusters food for thought when refiting the cables, the hubs have taken up the slack and may even extend the life of the cable?). A word to the wise for those people who are not in the know, E39's are renowned to having a poor handbraking system, so don't feel too bad if your brakes can't be adjusted to some garage requirements, this is just another means for them to get some more money out of you, check out the comments in internet forums, makes interesting reading.
If the red dash light remains on for the handbrake, most likely down to a damaged sensor, or requires further adjustment. Also check brake pad shoe sensor is attached and not damaged. (check diary for details).
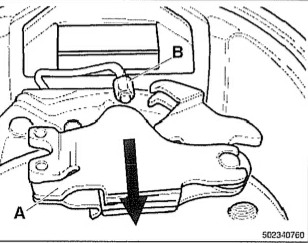
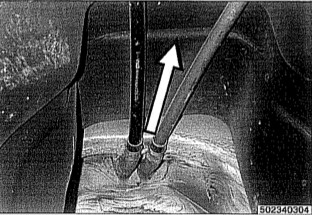
5. Reroute cable under car remember to use existing clips where available. (arrowed).
6. remainer of installation is reverse of removal. 7. Adjust parking brake by using adjuster as seen in brake layout (previous page)
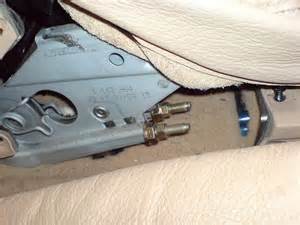
Handbrake adjusters (Nuts)
Hand Brake
Use spanner 'clockwise' (tighten) and adjust these 2 nuts. When adjusted, (trial and error) the brake should pull up to about 3 clicks.
fig.Source - Brake Cable under car inside prop and exhaust well
The following instruction is used in one of the workshop manuals, however you may not need to go to the full extremes i.e. partially dismantle:
1.Remove exhaust system - (just take off the retainer plates and let it drop slightly). 2.Pull parking brake cable out of body guide tube (arrow) and detach from routing bracket, noting correct routing for reinstallation. 3. Remove parking brake shoes (see layout p64).
fig.Source - Handbrakecable under car
fig.Source - Handbrake Rear Wheel Hub -
The new handbrake adjustments were accepted by garage to where the car was submitted to for an MOT and passed. Well, life always comes up with suprises, another 12 months of driving...
5
4
6 & 7
Use spanner 'clockwise' (tighten) and adjust these 2 nuts. When adjusted, (trial and error) the brake should pull up to about 3 clicks.