© Copyright Reserved - United Kingdom
Ideal Screen Composition 1024 x 768
5 Series Beamer
fig. Boot - Rear Fuse Cluster
66
65
Workshop
Contents Page
click
click
click
Diary of a Second Hand 15 year old Beamer (Maintenance - Battery Drain included...,
BMW E39 520i year 2000 Engine 1995cc)
M Series.
Workshop/Diary - Rear Control Arm O/S
continuation pending.....
.
Contintued....
07th August 2016 Into August and I decided to take the new neighbours to the local boot sale in the area and everything seemed ok with my beamer, battery was staying up, red brake light still on, but nothing untowards. Unitl! My guests and I, decided to leave the boot sale, to add, I had just bought some cheap imperial ring spanners and hand drills,for a tenner what a bargain....(See Diary Entry for full story -This job normally takes under an hour, however today it took 4 hours.)
On the way out towards the exit, someone wound down their window and told me my rear offside, (drivers side) wheel was falling off. I did feel something in the steering and a slight resistance as I was moving forward prior to this person's input. On quick inspection and a traffic jam behind me, I managed to pull in , onto a grassy verge.
What was the diagnosis? Broken axle? Control arm? Ball joints? Bushes? The only way to find out was to get my guests out and jack up the car. Car jacks are crap! There I have said it! I had damaged the sill, but eventually jacked the car up after loosening the bolts on the wheel first and finding a firm surface, (Boot board mat) to rest the jack on, to prevent it sinking into the soft grassy surface. With wheel off, diagnosis continued. Axle seemed ok, that would have beed an expensive repair, the control arm looked a little suspect, the rubber was broken and the joint very dry.
The tell tale sign is the slight bend in the brake dust plate, where the control arm had hit it, telling me the Control Arm was the problem, broken, without resistance and this was forcing the wheel outward.
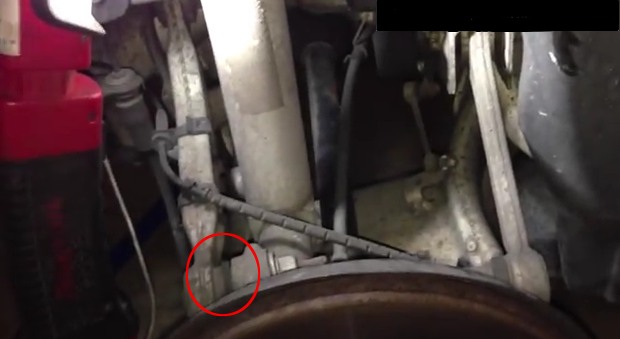
Rear O/S (Driver's Side) Wheel Well.
Upper Control Arm
Ball Joint
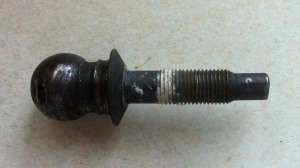
The rubber around the ball joint was cracked and very dry, one can describe it as brittle or flaky.
When the rubber was stripped, this is what the ball joint looks like detached or broken away from the control arm.
Note: this remained within the hub screw housing and just rotated at both ends - If the Control Arm was to remain in tact, have made the job a little easier, unfortunately today it was not so straight forward......
fig.1
fig.2
Hub
Screw
Housing.
Ball Joint End & Shaft
67
Note: Noting where the cables are situated and make sure they are above the Control Arrm when installing the new Arm. The clip can also be removed and placed onto the the replacement Control Arm - be careful not to break the clip.
Note: A breaker bar may need to be used for the nuts, possibly on the wheel when getting it off and both ends of the control arm if they prove to be subborn.
Plastic clip