© Copyright Reserved - United Kingdom
Ideal Screen Composition 1024 x 768
A free template by Lucknowwebs.com for WYSIWYG WebBuilder 8
5 Series Beamer
Diary of a Second Hand 15 year old Beamer (Maintenance - Battery Drain included...,
BMW E39 520i year 2000 Engine 1995cc)
M Series.
fig. Boot - Rear Fuse Cluster
Workshop/My Diary - Brakes
Dismantle and Reasembly of Rear Brakes - Basic Procedure
16a
16
Workshop
DO check the brake fluid levels on completion of task
16b
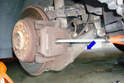
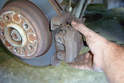
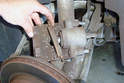
Here is the rear brake assembly with the wheel removed.
With a flathead screwdriver lever off the anti-rattle spring. This spring is under some tension so make sure it does not go flying when you lever it off.
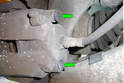
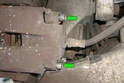
On the inner side of the rear caliper remove the two caliper mounting pin caps (green arrows) to expose the mounting pins. These are partially pulled out already.
Remove the two caliper mounting pins (green arrows) with a 7mm Allen bit
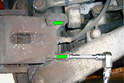
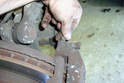
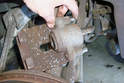
Use a flathead screwdriver to lever the caliper outward which forces the caliper piston in. Insert the screwdriver in the access hole towards the outside of the hole. Pull the screwdriver towards you in the direction of the blue arrow. You should see and feel the caliper
The brake caliper floats on the mounting pins. Make sure the pins can be moved in the caliper. If they stick they will cause uneven brake pad wear.
gradually moving away from the center of the car. While you are pushing the piston back into the caliper brake fluid will be moving back into the reservoir. Make sure to check the level of the brake fluid reservoir and remove extra fluid as needed.
Remove the pins and clean them. You can apply a brake lubricant (high temperature synthetic brake grease works well) to the pins after cleaning them.
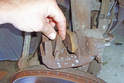
Remove the caliper by pulling it off the caliper bracket.
Sometimes the outer pad will stay attached to the caliper mounting bracket. In this case both pads (green arrows) stayed attached to the caliper.
Remove the outer brake pad from the caliper.
Push the piston back into the caliper. Here we are using a C clamp. You need a tool that will push the piston back in evenly. If the piston is cocked sideways in the caliper you will not be able to push the piston in. Remember,
while you are pushing the piston back into the caliper brake fluid will be moving back into the reservoir. Make sure to check the level of the brake fluid reservoir and remove extra fluid as needed.
Remove the inner brake pad by pulling it away from the caliper piston until the inner spring releases.
Push the caliper mounting pins back to the end. This will make installing the calipers easier.
With a wire brush clean the grooves the brake pads slide it to remove brake dust that can cause uneven brake wear. You can lubricate these grooves with copper paste or anti-seize and this will allow the pads to slide
Contents Page
easier in their grooves. Installation is the reverse of the removal process. Install the pads in the calipers. If your pads do not come with anti-squeal pads on the back of them apply brake anti-squeal before installing. After bolting down the caliper mount the new or old brake pad sensor wiring and fit the harness stays so they do not rub against anything while you are turning the wheel, Fit the sensor connector in the connector housing box and close the housing to protect from water intrusion. Don’t forget to install the anti-rattle spring. IMPORTANT!!! After you finish the brake job go into the car and immediately step on the brake pedal several times until the brake pedal no longer sinks to the floor. Since you pushed the pistons all the way back to get everything installed the pads are no longer contacting the rotors. You have to step on the brakes to get the piston to move outward and have the brake pads contact the rotor. The pedal will “come up” and get harder to press.
fig. Source Courtesy of Pelicanparts