In the next few days, I will be replacing fuse 4, to see if there are any adverse effects. If so, the problem is most likey soomething to do with the Windscreen Washer System, however this seems to be working ok...
29th November 2014 - Another task, to fit the pillar lights in place of the standard number plate lights, another one of those days. I needed to recharge the battery and accidently pulled the wiring as I lifted the battery out, (is a heavy battery) the wiring was connected to the reverse camera and reverse Sensors, so needed to repair and tidy the wires up out of the way of the battery access and put in the other battery without repeating the destruction. On fitting the pillar lights, I had also accidently pulled out the wires on the one LED Pillar so that one was totally U/S. Fortunately the standard factory plate light was still ok and it should cover for the broken one, this pillar light has not gone totally to waste as I can use it to keep the number plate in place. The camera side is working now, so all meets legal requirements. On reversing at night the standard reverse lights and camera light come on at the same time and is not too accessive. The positioning of the pillar lights are not where I would have liked them due to a double skin within the lining of the boot lid. Without access to the screw thread or wiring within the sealed cavity it is difficult to secure, once the a hole had been drilled. I decided to reposition the pillar lights and discuise them as numberplate attachment screws/bolts, this will prevent the numberplates being pulled off, (the original numberplates were only held on with sticky tabs that had seen better days and were vulnerable to wouldbe joyriders or would-be-opportunists.
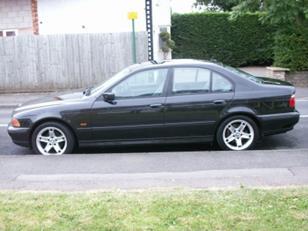
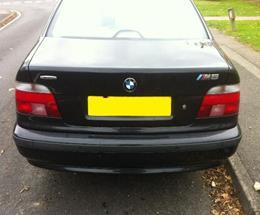
Diary of a Second Hand 14, now a 15 year old Beamer (Maintenance - Battery Drain included, BMW E39 520i year 2000 Engine 1995cc) M Series.
Problems with A BMW E39 Try the following and be warned of some; so called easy maintenance and mild profanity....
With the tyres on, I needed to sort out the Struts, before having the tracking done and proceeded with the project
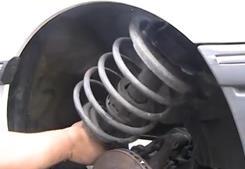
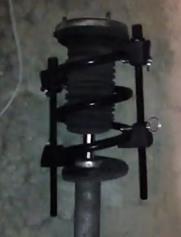
.Front Strut & Spring Removal & Refit - Replacing Rubber Stop and Gaiters. Have you ever taken a Front N/S Strut and spring off a BMW e39, what a B#'?h, it had taken nearly two days, I only wanted to replace the rubber stops and the gaiters on the shocks. My mood was: "The other side will have to wait, either for my death, accident or if I sell the car, then I won't need to bother!". It seemed like the spring was of a lower suspension configuration with a long hidden telescopic arm that liked to withdraw into itself...(I knew how that felt). So a purchase of a set of spring retractors with the help of my trusty neighbour, Kevin to transport me to Halfords, (£30 Halfords I had already had the car on a jack and was desperate) and with the use of only hand tools and a threat of having my head blown off by a part retracted dislodged spring added to the 'mood'. Definitely a Murphy's Law two days, oh! It had been raining all day, so totally wet through, a problem we will come back to.
Battery Drain Anyone with a problem with a battery drain over night? Yes me!.... I searched on the internet, problems arising with a BMW e39. Hell! The list was long...One suggested as a must. You should try replacing with a new battery (must be at least 100Amp with a 960cc start crank- for the e39) and can be bought on eBay for £58 New - Should be the first thing you check with any new/old car you take on, (more detail in Workshop). The other highlight on the list was to replacing the Hedgehog, I thought at the time it was a strange suggestion until I realised it was an affectionate term to describe The Final Stage Unit, (for the environmental heater/blower unit) technically known as the FSU resistor or fuse 76. Be warned there are people selling their old failed FSU's, ones on eBay (unsrupulous sw@*es- a recent update - prices have come down to around £19 now (mid Oct 2014) and used faulty hedgehogs may have been addressed, but be careful).
Old Version FSU or Hedgehog Replace with this Newer Version of FSU or Hedgehog
Another option: Battery lead (seen on eBay £40 seconds so not sure if they are the ones taken off cars with the problem, you can buy a splice kit for the battery end. Through research, I have discovered there is a shut-off resister or fuse mechanism that shuts down the battery, (battery end) linked to the airbags, once deployed it renders the electrics dead, this may accidently trigger without bag deployment, so one to be aware of.
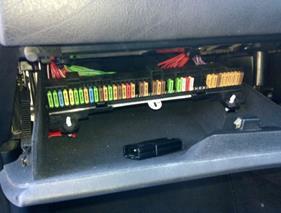
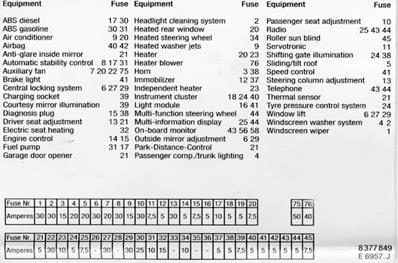
Fuse Option - Where is it? The Fuse Box or cluster can be found on the passenger side glove compartment, there are normally two white screw clips that lowers a panel down. I also became aware of fuse 4 (in the glove box). By taking this fuse OUT, the battery charge has stayed up for at least three days so far. Fuse 4 is something to do with interior lights and with the window washer motor, I also believe the factory fitted reverse sensors may also be influenced in some way on this circuit too, as my reverse sensors bleeps when fuse 4 is re-inserted, this one you will need to check on your e39 and could also be a culprit for battery drain.
....What I do suggest, is patience to find an electrical fault, and suggest you do NOT to take it to BMW ‘stealership’, as there are two tests £50 a throw. I had another problem with the Airbag Light (mat passenger side) as well as the battery drain. I knew about the airbag so they told me what I already knew and then told me it would cost me another £50 for a electrical analysis to find out about my battery drain problem. To rub salt into the wound they suggested the airbag problem can be rectified by paying them £480 for a new passenger mat and sensor.Fortunately there is an easier solution...
So two problems identifed so far with the electrics: I have identified the problem partly, to be: 1. Battery drain - fuse 4 - (Front Glove Compartment) 2. Airbag - Solution: I Bought a bypass off eBay for £12 allows the bags to go off if there is an accident (see Workshop). -Passenger Airbag bypass plug-in under passenger seat
3. An OBD code Reader (recommend Creator C110 for resetting sensors- good before an MOT) £32 eBay China arrived quickly considering (15 days). Handheld OBD II Scan Reader
Anyways' all Cheaper than £480 +Vat Showered, Fed and; It must be catching up with me...I .do ache everywhere.....
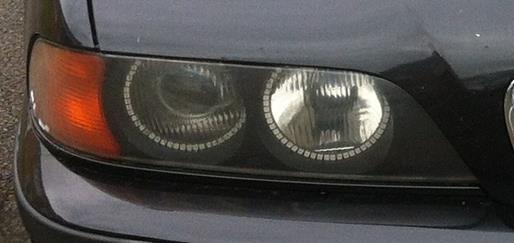
Cleaning Plastic Headlights I watched a few YouTube videos on cleaning misted headlights using toothpaste (Crest), water, fine emery paper, black Kiwi shoe polish one I added) and it worked quite well after draining the light unit and resealing it. Not before deciding to:
Fitting of Angle Eyes (Headlights) Eight days on, I have fitted LED Angel Eyes, well the LED rings at least and wired them up to the ‘parking or side lights’. Spent two days wondering why the normal sidelight bulb illuminated, and when testing for the live feed with a multimeter, I was not getting a positive reading. A blown bulb should have given me the clue, but went straight over my head…..
It dawned on me after a number of days and of hour’s thumbling around like 'Homer Simpson'. A number of years ago on another BM, I had the same problem and before that my father had a problem with the wiring of a fridge in a German made Caravan, wait for it…Yes! The Brown wire is the earth or ground wire, the other coloured wires to accessories, were the feed, the brown totally the opposite to what one would expect over here in the UK. (Brown or Red are usually the Live feeds). To cut a long story short, the Angel Eyes now work well, even change colours by remote. Worth noting....
Battery (Continued) With fuse 4 out, the battery is still charged and a start-up is on day 8, so-far-so-good….. I will also have to look at the reverse sensors and replace or clean up the connectors, so that fuse 4 can be replaced, but that will be for another day... (Last edited by NGW007; 14/10/14 at 15:08)
Adding a GPS Head Unit During the time I have been working on my E39, I ordered a head unit, GPS, Radio DVD etc. Only because I managed to sell my E36 on Gumtree. I was sorry to see her go. Unfortunately the head unit ordered was for a E46, no good for the E39 as the dash measurements were all wrong for the fixture, so I eventually returned it to Hong Kong for replacement. The postage, expensive or what? (£36). While I was waiting for the exchange.......
Sensors For those that have followed the E39 saga....It is now late October 2014, most of the jobs have been done on my BM. I thought I had solved the problem concerning the battery drain, however the problem persists. The battery can last up to around eight days now and a little longer by using a shut off switch or rotory knob on the battery. Initially, there is still a slight drain because there is an inline fuse connected to the battery to allow the alarm system to work. This extends the battery use for a longer period. (This will need to be monitored over a period of time).
Please also refer to the Workshop Section for more indepth detail into dismantling and fitting, the diary also accompanies the repairs, just to help and support you. You are not alone....!
Monitoring the Battery
02nd December 2014 - I decided to bite the bullet and re-insert Fuse 4 today and see how long the battery stays up. 03rd December 2014 - So far, so good, battery at cold rest: 12.3V Engine with load running at 1000rpm 13.56V Engine without load after a minute with load at 1000rpm 13.72V During a very short run around a block Onboard computer reads - brief 14.1 and 14.2V longer run pending 04th December 2014 - Still with fuse 4 in car started 3:45pm OBC reads 12v Battery 11.8V (before shutdown)at 1.5k rpm 13.9V (Engine Running) approx 2-3 mins.) Lasted 4 days
06th December 2014 - Battery flat 3:15pm, taken out fuse 4 again and returned a re-charged or recyled battery, there is still a problem with the fuse 4 circuit somewhere it seems. ( Note: Interior lights have been checked, and most of the bulbs have been changed to lower LED voltage, did this early November) 08th December 2014 - BM Started 12:07 fuse 4 out - 10 min drive Battery ok 12th December 2014 - BM Started 13:45 fuse 4 out Battery ok 15th December 2014 - BM Started 12:42 fuse 4 out 13.9 V Running 12.0V Standing 17th December 2014 - BM Started 8:50 fuse 4 out - 60 min drive 14.0V Running 13.0V standing 19th December 2014 - BM Started 12:30 fuse 4 out - 13.9V Running 4 mins 12.2V standing 22nd December 2014 - BM Started 10:45 fuse 4 out - 13.9V Running 2 mins 12.1V standing (15 days ok) Retaining charge is a little weak and could still be something to do with the alternator.. Note: Taken off the battery isolator and secured the main negative earth strap - solid contact 24th December 2014 - BM Started 9:30 fuse 4 out - 13.9V Running 15-15 mins (17 days ok) 27th December 2014 - BM Started fuse 4 out - (20 days ok) 28th Decemeber 2014 - BM Started 11:35 fuse 4 out - 13.9V Running 2 mins 12.7V standing 21 days ok 30th December 2014 - BM Failed Start 12:10 fuse 4 out - Battery dead Total 23 days
The battery remains up for around 23 days, this is a big improvement from the earlier days of receiving the car. I will need a period of constant use to assess the battery and alternator, not sure when this will be.
07th Feb 2015 - There are still a number of small jobs to do, replace the alternator is one, give the car a good clean, that's 2, as it has been outside these past few months. However, there has been a number of cold morning frosts and the air can only be described as 'sharp', requiring at least three layers of clothing, so hibernation is still the key, at this time.
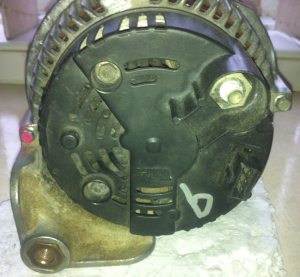
14th Feb 2015 - I managed to pick up an Alternator 120 Amp, (£40 Railway Salvage) I have given it a good clean to the point of seeing my reflection in the metal and thought I might venture out into the wilderness of suburbia to fit it, as it should only take an hour or so. (I don't know why I keep say that?) they can be fiddly, especially having to mess around with the serpentine belt. I did losen the radiator couling, just incase I required more 'fiddle room', however not necessary. The Serpentine Belt Tension Bolts can be awkward to access, (Steering Fluid Well and Upper Radiator Hoses can be in the way). The Alternator is held on to the block by three bolts, one on the top, front, left as you face it from the front of the vehicle and two bolts on the bottom, front, left and right of the Alternator. (Be careful not to take out the lower thin bolts as they belong to the lower bracket and not needed for this job - yes I did that too!) After taking the alternator out, I was ready to replace it with the replacement, only to find it had a pully with four ribs. I needed a five rib pully for the correct width and ribs of the sepentine belt. Not a problem as the original alternator had this and I just needed to swap the pully over to accomodate. After an hour of trying to get the retaining nut off the pully, time was ticking by and it was starting to get dark, I decided to put the oringinal Alternator back on, (so the vehicle could still be used). This time the job was elusive from completion and it was not going to be an easy fix as I had hoped. On returning the original Alternator unit to the vehicle there were problems with lining up the bolt holes and fitting in the main alternator body at the same time. I eventually worked it out, by lowering and pushing the alternator towards the engine block at the same time, this helped to line up the holes. Let us just say it was a tight fit I haven't given up on fitting the replacement Alternator, just postphoned it, this will allow me a little more time for the penertrating oil, (WD40) to work on the retaining nuts and good weather, before commencing with the job again...watch this space.
Standard Factory Fitting
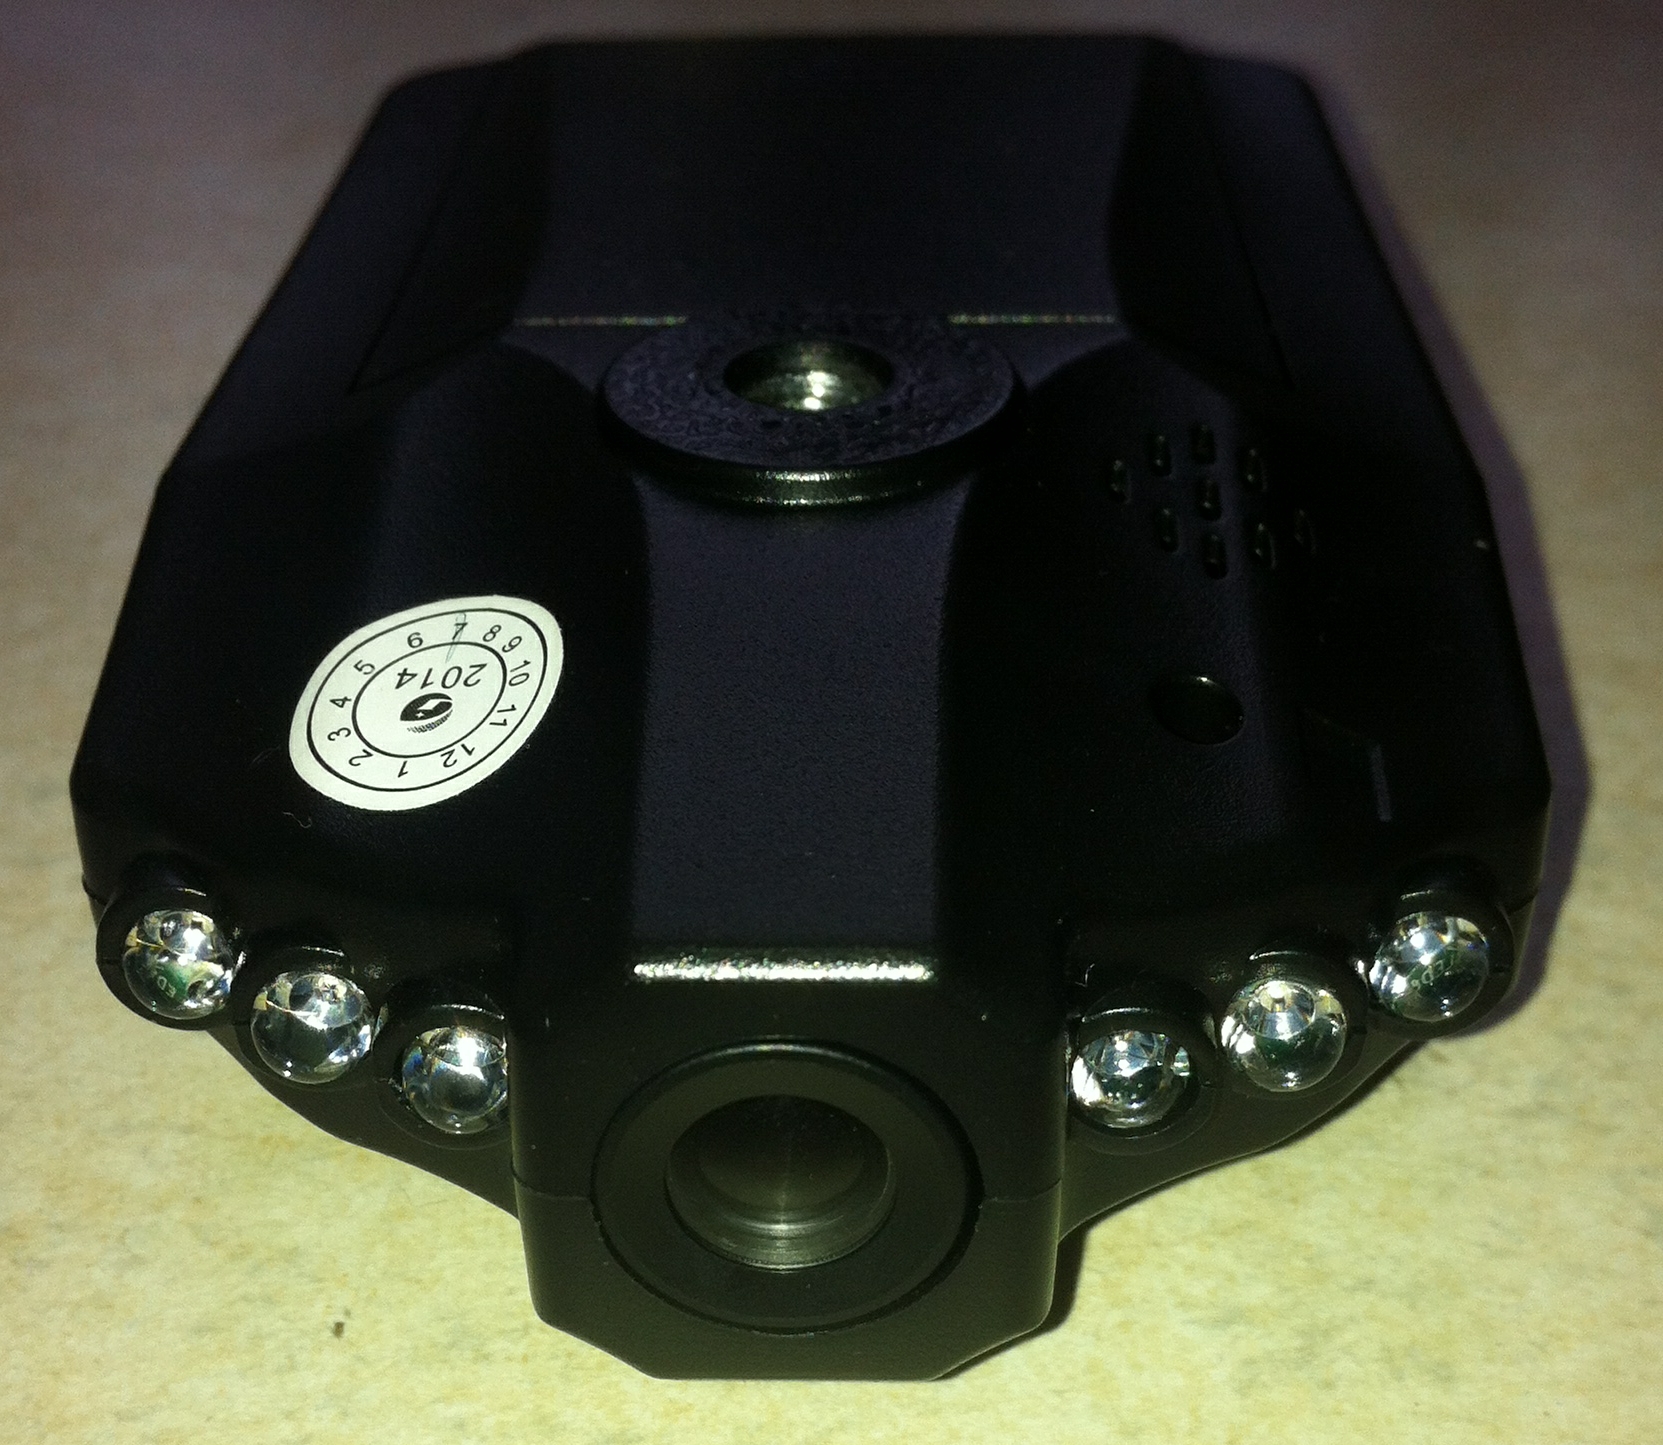
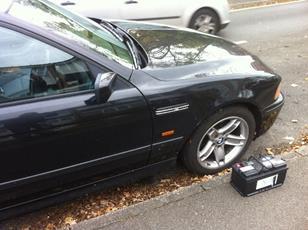
VidCam or 'Black Box'
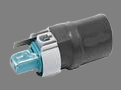
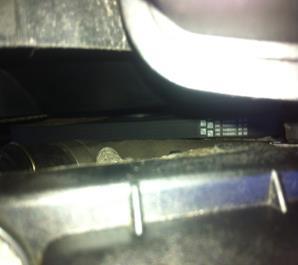
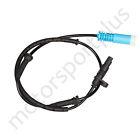
fig. Inline Fuse Connector
Welcome to my Diary on the experience of buying a car that has had a number of owners, we have all been there, especially if you don't have a salary to match your dreams. We all know that this can be an expensive gamble, especially if you go to back street dealers.
I bought this Beamer on the 13th July 2014 from a garage, lets just say somewhere on the Warwick Road in Birmingham, West Midlands, UK . I needed to drop my E36 as the bodywork was in need of some tender loving care and I just didn't have the finances to entertain a full facelift for the age of car. Mechanically it was sound, I do like a safe and legal car, especially when I need to transport family and friends anywhere. That doesn;t mean I am shy of a good free-for-all down the motorway, who wouldn't? So cash paid over, I thought at the time the price was reasonable compared to many Beemers of this age and condition, they were selling for much more..... no, the penny hadn't dropped! The time was around 18:30 and a neighbour Kevin and I had seen a few 'buckets' and Kevin had seen a garage still open as we were heading home, and so the story begins....I did notice the BMW in front of the yard and thought at the time it looked the 'business', however thought it would be beyond my pocket. Looking around quickly I could see a number of cars that had seen better days, but were affordable, so I asked at the office (portashed), if they had any BMWs, preferably 3 series, as I already had an E36 and needed to upgrade to a later model. The 'salesman', suggested to his colleague the BMW in front of the yard was for sale, so I asked to have a look at it. I was smiling as I looked it up and down and inside-out. Strange, one does not pick up on the obvious points of concern until you get the vehicle home, weird that.....! I did test drive before purchase and it made all the right noises. I asked about the MOT, 12 months, that was good and then the tax, 12 months better still. Then the price.......wow, ok 14 years old, it had got to be better than the one I had ....and ok it was a 520i SE M series, had a few horses under the bonnet. I was sold! Just to let them get the impression, I knew what I was talking about, I asked how many keys did it have? Unfortunately it only had one and the salesman did say the car had only arrived in the last few days and he was still sorting them out, as the key didn't seem to be programmed and would only open the doors manually, not the greatest of starts. However looking over the car and a test drive, it did run smoothly, gears shifted well, clutch was sharp and the engine was sweet music to my ears. Checking externally, there were a few little problems, i.e. a little rust here and there, the headlights were a little misty, we seem to be bonding..... nothing untowards and could be fixed, tyres were a little worn as indicated on the MOT. (MOT, yeh, right!)
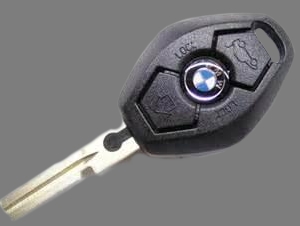
The original key was a slight problem as it was sticky-taped together.
Pillar Plate Lights
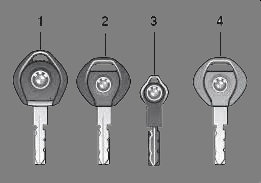
No. 3 is the plastic style key BMW Dealership: £34!
Note: Dash light malfunctions including battery drain can also be linked to the ignition switch. Check out Ignition Switch - Video in Resources
On having the Beamer checked out at my local Dealership 'Sytner' and spending £50 for a diagnostic concerning the battery drain, they decided to inform me of everything but the cause of the battery drain, this included the wear of my tyres: It was more like an MOT, but without the MOT certificate....in other words, a pointless exercise....
Tyres: - n/s/f tyre put on in the wrong direction - o/s/r tyre worn down to 2mm and 0mm on outer edge - advise replacement - o/s/f tyre down to 3mm advise replacement
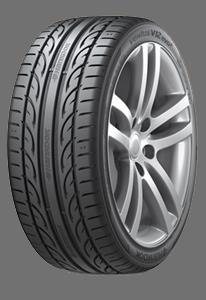
30th August 2014 - Replaced 4 tyres with the new 235/45R17 97Y Hankook K120 XL tyre @74.03 Rolling Resistance: C Wet Grip: A and Noise Performance: 70 This included environmental diposal of old tyres, tyre valves, wheel balancing a good tyre swap for spare. (£387.11)
I did have to shop around and found my local Plume garage promoting this make of tyre and decided to do some research:Extreme running through advanced technology and described by Hankook as “a tyre designed for drivers who like to express their own style which delivers outstanding performance in sports driving,” the Ventus V12 Evo 2 K120 uses Kontrol Technology - Hankook Tire’s technology philosophy - to offer full control between the driver, the car and the road.
fig. Before - Factory standard fig. After - New Head Unit
Sensors - I decided after chewing over the cost of factory sensors, to order a cheap reverse sensor kit (£9 EBay include four sensors, control module and a bleeping monitor) to replace the all expensive 'sealership' sensors (£15 EBay per sensor or £35+ £65 from dealership per sensor).
Battery - I was still having problems with the battery drain, very frustrating...I decided to check combinations of groups of fuses. 1. Unplugged the PDC Module situated in the boot above the battery (This is the reverse sensor control box for each of the reverse sensors). 2. Taken out 40 amp Fuse (Boot - Heated rear screen) - replaced later as no problem found with it. 3. Taken out fuse 4 Interior lights/washer/reverse sensors) - there was definitely a problem with this circuit.
I concluded this was going to be a slow process and slowly, will have to spend a great deal of time illiminating possible causes and sorting them out with a multimeter - it would have to be on a warm day. Meanwhile the three batteries I had accumilated will have to be used and charged in rotation.
10th November 2014. Head Unit - Aerial adapter arrived and now fitted, radio works fine and the head unit is now securely screwed in. Not too impressed with the security, as held in by two screws, but it will have to do, I will also connect an anti-theft wire I had stripped from an old radio unit, (will also need to check on my motor insurance to include this on cover- (done! and surprisingly I am covered...Wow!)
With fuse 4 out, the battery does stay up, usually for approximately 7 to 8 days, I am not using the car much and no doubt during this time the battery will drain. On further research an article suggested there is a module within the foot-well on the O/S (under driver's seat, seat requires unbolting). Fusebox located towards the door sill, to gain access pull up carpet), this periodically gets either condensation or water build-up and can have an effect on wiring, check the capet for moisture as this is usually a good indication that there is a problem, this is worth exploring. (See Workshop p9).
11th November 2014 I have received the reverse sensor kit today, I thought I could replace the megabuck sensors with a cheaper set, 'one gets what one pays for'. The control module doesn't work. I found that out after fitting to the BM, so need to return or get a full refund (eBay) pending...may get the control module only replacement. With fuse 4 out, and the sensors disconnected, I believe the car is working reasonably well with one exception of a rear number plate bulb not working. Checked it out and I have discovered a problem with the bulb socket and or possible wiring short. The bulb sometimes illuminates when inserted into the socket and goes off again very briefly, will investigate tomorrow, could be the cause of the battery drain....
13th November 2014 - ok, swapped the rear O/S, (or right) number plate bulb socket unit with the one I took off the N/S (left) for the rear camera and previoulsy stored away, the number plate light now works. I will have to link in the camera light to the number plate light so both lights work when dip/driving lights are turned on and ideally the camera light will also work independently when having to reverse. Not sure if there will an overload with the lights on and having the reverse light on also, will see. Ok, and after a great deal of thought, this was not going to be the solution. I needed to attach an external regulator or have the option of using separate pillar lights, as the camera light will only come on for reverse and I don’t particularly want the camera light to be on when the driving lights are on, so a separate light seemed to be the solution, pillar lights will be needed (£2-3 off ebay). I contacted the people I got the reverse sensor kit off, (from eBay) and they have been kind enough to offer me a full replacement kit for free, as they had some issues with quality control, it seems. So I am expecting a new reverse sensor kit to be delivered in the next few days, one needs a good smile from above occasionally...
- Fuse 4 is still out, and battery is staying up (approx. 6 days so far). I will see how far it takes me, before putting back the fuse 4.
….and wouldn’t you know it, (the smile didn’t last long from above did it, or was I jumping the gun?) a letter from DVLA suggested my TAX for my BM is void due to the previous keeper, (the seller, garage) By all accounts the seller that sold the car to the garage (and who was not the named owner on the log book, I may add), payed the car tax before selling the car, by cheque and once sold to the garage, cancelled the cheque making the tax void. I bought the car with 12 month tax, the TAX as was agreed at the point of sale. The letter suggests their bank returned their cheque unpaid going against the contract of sale, B~?@:>ds, so will need to chase that up with the garage and possibly CAB (no doubt at my expense). I did go to garage and they gave me all documentation, that they had, and I visited my local Police Station and explained the situation, however they pointed out that it was a civil ofense and couldn't do anything about it and suggested I tried to sort it out with the garage. The problem was with the garage as they accepted the vehicle and logbook from someone not named on the logbook. They should have asked and seen more ID, before buying... I compiled and sent a Letter to DVLA. (update: Never got a reply and it is now Janaury 2015 a typical bureacratic agency, happy when they get the money and unhelpful if you need help). Obviously, 12 months tax had to be paid for to make the car legal, this can leave a bitter taste. (Small claims can be expensive).
16th November 2014 - Head Unit With the Head Unit fitted, I decided to checkout the functions and did have to get my head around using SD videos to display on the screen, and this is what I found, for those who are having the same experience.
Note: on CODECS and functionality of Movies written to SD Cards - Testing best video file formats for Eonon D5166E for E39 (Also applicable to D5102) (date: 16.11.14) Eonon D5166e This unit has been designed to play DVD and music videos, downloaded videos from YouTube, (Using YouTube Downloader) in the native .mp4 and converting them to .avi, or DivX setting using 'illisoft Video Converter Ultimate' testing LOTS of different files and formats and here's what I've found so far. Videos must be in .avi format, it will only play .mp4 if you put them on the 'Micro SD' style card and use the left-hand interface on your Head Unit and use the appropriate menu. Using the SD Card Menu, it does not like high frame rate videos so test what suits your unit. It struggles with .avi's running at 29.97 and 30 fps. It was able to get near perfect playback with 25fps at 1100kb/s video + 128kb/s audio at 44100 Hz (stereo). A few clips may still hesitate so, (depends on your system) something around: 24fps @ 950 - 1100kb/s video + 128kb/s audio @ 44100 Hz (stereo). It may not play videos in its native resolution of 800x480, or higher, such as 1280x720. If it's a 320p or 420p video on YouTube, the resolution of the downloaded file should be just fine, so leave it as is. Try not to go above 720p, you will have more success with scaling the resolution down to 720x480, you may need to test other solutions to ‘tweak’ some aspect ratio issues, however the video function works on my Unit ok now from an SD card.
WARNING: (Note-1: DVD and other video format should not work when the vehicle is in motion - Without me taking the moral high ground, this function was designed initially for safety, to prevent the driver from watching videos whilst driving - NOTE-2: SAFETY FIRST you maybe transporting family and friends and the following process can be dangerous to you and others if any function is bypassed as it can cause distraction). Note-3: If you want to use the DVD or SD video function on the move, for PASSENGERS ONLY, the following needs to be applied: a) Look at the back of your Head Unit, one of the wires should be labelled 'BRAKE' or with an equivalent associated label, colours can vary from 'Pink', 'Purple' or 'light Green' - Check your Head Unit wiring diagram/Instructions to identify the wire normally connected to the brake switch. Once the appropriate wire has been identified, b) 'earth' this wire or if unit has already been fitted, and all wiring is installed, detach the appropriate wire from the brake switch (attach wire to earth, inline or on the car chassis). c) Switch on your Head Unit, d) start the car engine and the video should play - at key setting one and two and whilst moving. Check your DVD first and then your SD Card loaded with your appropriate movies. If not working note your CODECS display format, as noted above.
General Recap After exploring with the FSU, (Hedgehog) and replacing it, experimenting with various fuses, replacement battery, new drive belts, checked 90 Amp alternator, I found my problem is with Fuse 4, (front glove compartment) this covers Windscreen Washers, interior lights, trunk lighting and it also touches on reverse sensors and number plate lights it seems. On putting in a reverse camera into one of the number plate lights and replacing the interior bulbs with LEDs, I found the o/s number plate light unit, (where one fits in the bulb) would cause the bulb to malfunction. The bulb would illuminate for a split second and then nothing. By Replacing the whole unit with my spare one from the the n/s (Passenger side - from where the camera was installed) seemed to do the trick and the bulb worked ok. I explored the reverse sensors as they were not working, by taking each one out of the bumper trim and found the ends would detached easily, exposing a blue and white wire. With this, I replaced all of the sensors with a third party cheaper set, they all work now and I have a visual monitor that will indicate distance with green, amber and red ligh bars and it bleep too.
(Day 18Fuse 4Out - 24th November 2014) The battery has stayed up now for a round three weeks (without fuse 4 plugged in) the only thing I am missing at the moment is the windscreen washer. I am giving the BM a couple more weeks to assess the duration of battery charge, (on checking it regularly and with little use, it remains charged) .
Yesterday (23rd), I decided to address the reverse sensor issue on the rear bumper, (with fuse 4 inserted) every time I place the gear into reverse, I was getting a long bleep, this is normally an indication that there is a problem with one of the four sensors. On stripping the trim off the bumper, it allows me access each of the sensors one by one. Each sensor was checked. Yep! The third O/S sensor had a blue wire poking out of its’ ‘inner face’, the other wire, well what other wire?….. A new sensor is now on order (this may be the battery drainer, possibly)… I have connected the three sensors and left the faulty one out with the plug shoved in a recess, leaving fuse 4 connected to see if it is the culprit for the battery drain.
Reverse Camera This left me with another task, fitting a reverse camera that fits into one of the number plate lights, as a replacement - £12 from eBay. On the delivery of the replacement head unit, the camera would eventually connect to it…… pending…and that should be it! (Yeah, right! Watch this space). (See Workshop p29)
The radio/casette seem to work, heater ok, fluids were topped up, no oil floating in the radiator, headlights worked, dash lights worked, the airbag light stayed on, didn't seem too serious at the time, as this happend to me before with the E36. A slight smell in the vehicle from a dodgy scent fob, (discarded immediately).
Under the vehicle, the exhaust and cat seemed to have some life left in it and with the e39, plastic panels were attached underneath protecting brake pipes from erosion, also good. In the boot, DVD player was evident, spare tyre, wheel lock, jack, chock, not all tools were present, not a problem as I could transfer the tools from the E36.
Parking Handbrake was a little suspect as it was 40% effective, could be shoes or cables, another easy job. I normally replace brakes on any new vehicle. Not all interior bulbs worked, cigarette lighter was temperamental, centre stop light was not working, the battery was in the boot and looked a little smaller than I was expecting, it was working , so I never thought anymore about it. Everything else seemed ok.
Shook hands, and paid the price, tried to talk him down, but he wouldn't have it, so bit the bullet and paid up. Just needed to get it home and draw up a 'To Do List'! 1. Brakes, 2.Fluids,....3.control arms, damn... battery, etc..etc..etc..
Keys
The Story Begins.........
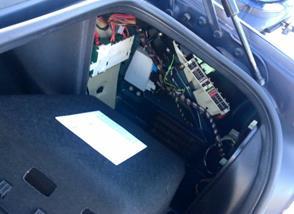
Note: See Workshop for other discovered fuse boxes
It is implemented to ensure Hankook Tire provides the greatest benefits and driving experiences they can to customers in terms of safety, (rated 5 stars) driving comfort, handling, performance.
Extra Features •Tread Cooling System - To speed up water drainage and improves heat radiation at high speed. •Stealth Technology - A unique wing tip design to reduce noise levels. Slanted edges support the blocks and the surface reduces impact. •Compound Technology - New styrene polymer compound improves the chemical combination, making the tyre more durable and stable.
Example of Pricing for this Product Unit Cost £74.03 x 4 Valves £6.12 x 4 Wheel Balance x4 £16.36 EDC Charge £4 Taxes £64.51 Total £387.11
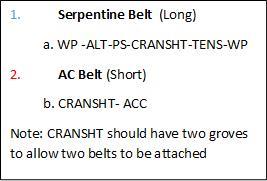
fig. AC Belt (Short)
fig.
fig.
fig Serpentine Belt.(Long)
fig.
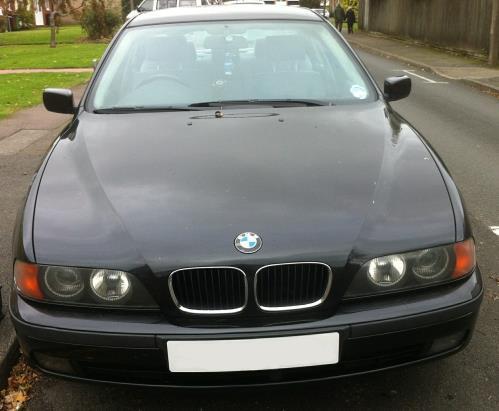
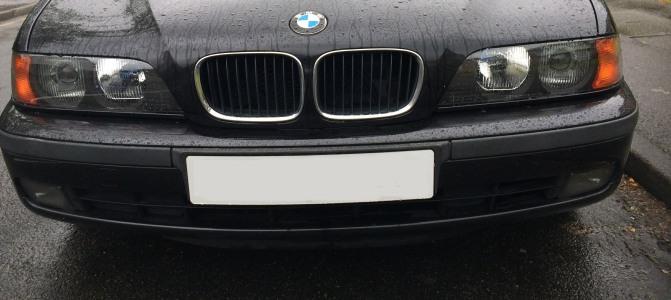
fig.Front View e39
fig.
fig. Headlight with LED A/E
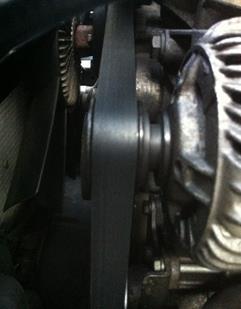
strength of a Gorilla with a multidimensional pulley dynamic mind, I must have become one in amongst the mist of blue and the belts were eventually on, mainly through desperation and spiritual intervention. It was just left for the bits and pieces to be reattached or refastened and the Job was done! It Took about 2 1/2 hours - fan, radiator in place - doable!
fig.Reverse Camera
fig.
25th November 2014 - The battery is flat again, this maybe down to not using the vehicle every day. I also - Received the delivery of a pair of pillar lights for the number plate, most likely to replace the existing factory standard number plate light fittings, I will fit them when the weather is a little better.
The problem with the key was it required programming and tidying up, an easy task if you know what you are doing, however I didn't, I puchased a couple of blanks with cases (identical) for around £8 eBay and then went to get the blades cut. Not so easy, as many locksmiths refused to cut them and directed me to the main BMW dealers. With all honesty, there was one, however, it was their first time for cutting BMW keys and, (hopefully their last) the key cut was not good, obviously it didn't work and to my desperate disappointment, (Good in one way, bad in another - it looked like I needed a new one from the dealership). To rub salt into the wound during a cleaning session of the car interior to get rid of the smell, I had the original key on the driver's seat and accidently kicked it outside the car door as I was, reaching down into one of the crevices, clean, clean, clean...didn't seem a problem until I heard the splash, Yep! Straight down the storm drain. Now why didn't I put the key in my pocket? I usually do! Spent the rest of the day fishing for it. I ended up chipping the tar from the road, away from the cast Iron grid to open the grid. I borrowed an old garden tradditional rake from a helpful neighbour, this proved the ideal tool to recover the key after trying an array of other objects, (I also owe the neigbour a flour sieve with a handle). at this point soggy, but recovered and the key could still be used manually. Over the next few days drying out and trying to get the electronics to work and at this point no luck from the internet into the method of programming, I had to conceed to the fact of having to go to the main dealers. The bill was for one multi-function key shipped from Germany and one plastic spare general key (BMW Dealers £179.50 including programming). Not a good day!
After a couple of weeks I eventually found the information on programming the key on the internet (YouTube). The information seems more accessible in the USA and there are no problems in getting keys cut as is, in the UK. (Checkout Resources for further Key Programming Information from the Contents page).
fig. Source
fig.
fig.
fig. Source - R/Stop/Gaiters
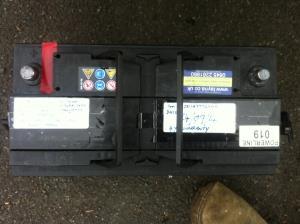
fig. E39 Battery
(See Workshop for more details)
fig. Replacement
Some notes to consider before changing an Alternator: See Workshop Pg18
26th February 2015 - Like most winter months, one can look outside and expect rain, on looking out of the window, there is rain and a good breeze, so no inclanation to going out into it. However I have been busy and I have identified a few tools to restock my toolbox, they could be useful for later jobs requiring attention hopefully, in the long distant future and when the days get warmer. (There are write-ups on these tools and they can be found within the 'Workshop', indexed under Tools). 27th February 2015 - After wrestling with the replacement alternator I did manage to get the nut retainer off the pully, on doing that, it wasa an ideal opportunity to check the state of the inner fan and inner coil or inner workings of the alternator. The main bearing was sound and rotated freely with just a little resistance, so was good, I couldn''t see the condition of the brushes without stripping down the unit further to gain access. I did have to get a wire brush attached to a drill, to get the rust off the rotational element and the surrounding magnetic casing.The fan blades were folded back to their 90 degree angles and the case replaced and bolted back on to the unit A quick smooth swirl of the pully bolt and this task was complete for now. This now leaves me with taking the 90amp alternator off the car and to replace the pully with the 5 rib, another wrestle match - Guess what? Raining!...job for, yet another day..
4 Ribbed Pully Extracted
fig: Replacement
fig: Wrong Pully
Check out my other vehicles and my everyday sagas, one may pick up a few tips along the way
fig:Source Hub Key
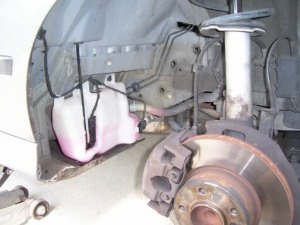
fig:Source Windscreen Washer Bottle
fig: Source - Handbrake shoe layout
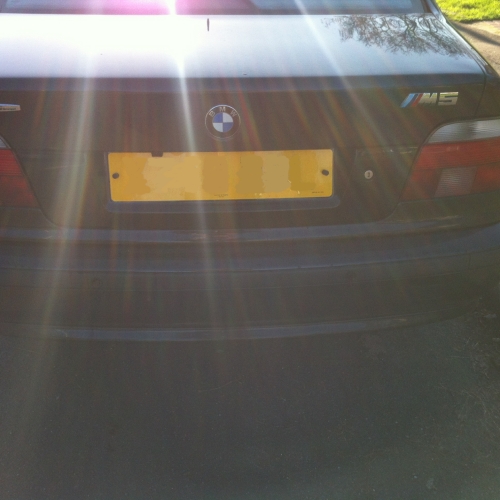
Rear E39 with Reverse camera
Adjuster
Use spanner 'clockwise' (tighten) and adjust these 2 nuts. When adjusted, (trial and error) the brake should pull up to about 3 clicks.
is one of those jobs you don't really need to do, but it always has a go in the back of your mind. One more job completed.
19th November 2014 I have had a VideoCam in my previous e36 and transferred it to the e39, however it has been running using its own set of installed batteries and it only records for a few minutes at a time, (this camera is also known as the car’s black box in places like Russia), so today’s job is to link it up to the car electrics via the cigarette lighter with a lighter point extension. I still want to use the cigarette lighter for other accessories, and the extension will be hidden in the glove compartment and the wiring will also be hidden behind the trim. Normally I would place a switch inline, this is not normally necessary; as a switch is built into the camera. Well, did it anyway, more for peace of mind and extra safeguard,after noticeing the webcam does sometimes shut down after 16 minutes when car ignition key is removed, however there have been times when it has not, hence the extra switch.
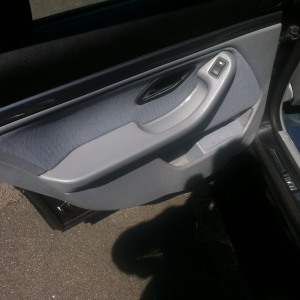
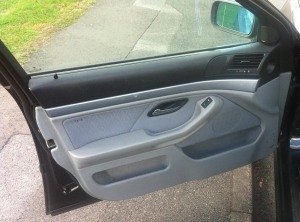
fig: N/S Rear Door card
fig: N/S Front Door card
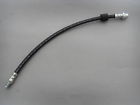
The old pipe was porous, - enough to turn your hands black, however the new pipe has an outer braiding.
Price Check Update: Checking through eBay I have started to notice a slight trend and that is prices are slowly reducing and items previously sought after are becoming more available, such as the vacuum pipe, now advertised for around £4-5, however is only about 3.5 inches or just under 10cm in length, FSU is between £14-19+, reverse sensors (originals) £9+, insulation tape 99p for 35m, to name a few. So it is worth to shop around.
03rd June 2015 - It is now the beginning of summer, we shall see.... as suggested the MOT is coming up and it is one of those situations like the lottery to whether one can find a garage that will not 'rip you off'. I have gone with a new local garage a few miles away and their MOT start from £29.50, (normally £54.85) well it is a start, they have seperated from the mother company and now promoting themselves hence the price. From my experience, this is usually a sweetener to get you through the door, I will let you know more after the test, my test is booked for the 11th June 9am
Late afternoon, 3:30 pm, I decided to have a look under the O/S wing where the windscreen washer bottle is situated, to check the wiring and to also have a look at the back brake dust plate. First I needed to jack up the BM and take the wheel off, now for the water bottle. The under wing 'boot, skirting,' call it what you will, has around 7 screw bolt heads and around 4 plastic push studs, only the lower half of the skirting needs to be exposed, note, the plastic push studs can be damaged easily so care should be observed when taking them out or replacement will be needed.
18th June 2015 - All of the parts had arrived and I couldn't put the repairs off any more, my car was not legal for the road and it had been about a week now having to use a bus, it was not a good experience.
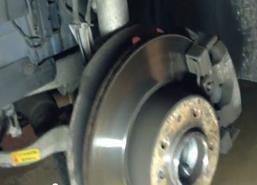
The first job tackled was the brake hose for the N/S front brake, everything stripped down ok until I tried to get the hose off. The end on the caliper was stubborn, however manged to unscrew it. The other end connecting to the copper or steel pipe junction was a problem, rusted solid. after a couple of hours.....yes I said hours I had, had enough (Bearing in mind I was not using a ramp) and the day had given me a case of mild sunstroke. I decided to push on, retightend the hose, untwisted and tidied it up and placed the new pipe in the back of the garage. I tightend the strut bolt and found the thread had worn slightly, (BMW Dearlership wanted £13+ vat for a new bolt and nut). I found a thick washer in my washer tin and used that. The next job was the O/S rubber boot replacement, a job I was not really looking forward to. By this time, I wasn't looking forward to anything... With O/S front wheel jacked up, wheel off and a period of procrastinating, I managed to get the Lower Control arm disconneted at the opposite end of the ball joint as the ball joint just didn't want to let go. Now with a small lump hammer a few slogs (note: with the bolt protruded up and with the nut protecting the thread the thread can take a few compressions, however, a good slog on the iron housing) and the control arm dropped. A quick inspection and the rubber boot was totally shot. The old rubber was prised off with a screwdriver and pliers and the area cleaned with a rag and grease was then applied to the ball joint and the inside of the rubber boot replacement, then fixed to the control arm. (Note:The boot base does need to be manipulated into position, the grease helps). That just left the ties that came in the pack, (I found the ties, x4 upper and lower, are much better than the metal wire rings that normally comes in the packs as there are no need to force them around the boot, much less hassle. The wire can also tear the rubber if not careful). A quick wipe down with a rag and the control arm was refitted, this job did seem more straight forward than expected, so was a pleasant change, the job was done!
11th June 2015 - Today was the MOT and unfortunately it failed on the following point: 1. N/S Strut bolt lose (that was a surprise!), N/S Brake hose twisted, possibly required replacing, 2. O/S Lower control arm needs replacing and 3. handbrake was binding on O/S. Well! After all the work and checking the vehicle one feels a little nift...
12th June 2015 - As money is tight, I got to search on Ebay and other possible sources to try and find a new n/s front brake hose, checked prices for control arms and then the replacement boots and finally hand brake cables. I ended up finding the rubber brake hose (Ebay - Keep_driving £6.99), two new handbrake cables (Ebay - parts2clear £19.90) and rubber boot replacement - set of 3 universal with grease (Ebay -rtgroup11 £7.99). They all eventually arrived, and I had 10 days to return the vehicle for MOT retake, the clock was ticking and I couldn't really do anything until the parts arrived.
On inspection of one of the control arms I noticed the rubber boot was a little flaky to my slight annoyance, as this control arm was replaced a few weeks after I got the car. The tie had obviously rubbed onto it after a period of time and damaged it. I don't think the rubber had split and I am hoping the BM will get through it's MOT, we shall see. The problem with the brake dust plate is that the lower hole on the left of the plate was oversized, (Aluminium, erosion) and required an oversized washer to reform the bolt hole and overlap the eroded metal. The bolt was also missing so also required a bolt. I hadn’t got a bolt of the correct size. So it just left a conspicuous repair using another tie threaded through the plate and away from the rubber boot on the control arm. This was completed successfully and was much better than the first attempt but only as a short term temporary repair. Check for rotor clearance, (no scraping noises), calliper, wheel, refitted, brake pedal depressed a number of times and job done, for now. It feels like two paces forward and two paces backwards on today’s exercise. However, one is aware of what needs to be done and mentally register it; the problem
This just left the brake dust plate to be addressed. What I would advise is to check to see if you can unscrew the torque or Allen key screw in the hub before disassembling the brake calliper. I didn't, thinking it would be straight forward, (usually is) in this instant it wouldn't budge. One can use WD40 penetrating oil or a Bunsen heat or hot flame. As time was ticking I decided to cut the old ties from when I addressed the problem before, as a quick resolve and used a fresh tie to secure the dust plate away from the rotor, a spin of the rotor to check it moved freely without the screeching and this job was done for now.
28th May 2015 - A turn up for the books, BMW dealership has contacted me, from London to inform me of my MOT due date, always polite and they would like me to book up my MOT at my local dealership for £39, not a bad price considering they charged me £50 for just ticking a checklist of what I already knew, rather than check the electrics as I asked them to do when I bought the car, (see earlier entry). I remain a little weary as they stung me and it makes me wonder if they will do it again and find a load of unnecessary problems....I will have to ponder on this, I have until approximately mid June.
29th May 2015 - The weather lately has been an unbalanced mix and further work on the car has been at a standstill. I have drawn up a list of jobs, the main one I want to address is the o/s front brake dust shied, I have had to tie it up using a plastic tie, as one of the retainer bolts is not retaining part of the plate, if left, it would continue to scrape onto the brake rotors like someone clawing an old blackboard as they are going down the street, obviously the rotor will also need to be replaced because this will be damaged, (replaced in pairs) and may cause problems with braking and steering and here starts the money pit, I believe you get my point. Catch it in time, tie it up with a plastic tie, until the problem can be sorted. The problem is most likely down to rust and needs to be fixed by using an oversized washer to cover the eroded metal and give a firm bolt hole, not ideal, but effective until one can afford to replace the plate, (new ones are around £42 off ebay and cost even more from a dealership, there are deals such as a full strut, hub, rotor and plate for £25, (eBay) so one can be tempted, another option is the local scrap yard, again one needs to remember they are also out to make money. For me it will have to be the washer as money is tight, especially with the MOT coming up.
I checked the wires and insulated them, nothing really unusual there except the one wire on the left, (as seen in the image) was connected to the offside wing light indicator, the functionality, wiring was checked and was ok. This has now got me thinking it may just be down to the wiring going to the steering column and possibly the stalk or ignition switch....(Note: The wiring cannot be accessed from the O/S filter box in the engine compartment.) The skirting was reassembled, bolts in place and the odd plastic stud repaired or replaced.
See Workshop page 62 63
fig: New Length Vacuum Pipe fig: 5mm Diameter
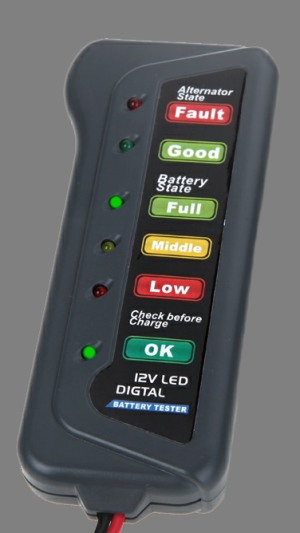
I decided to also look at the glove box fuses and found that the fuses are mounted on a bar that is detachable; this allowed the wires on the back of the bar to be more accessible, however still a little awkward. I identified the wire going to fuse 4, [Red with yellow squares] and slightly pulled it and also pulled the wire harness. It seemed as there was just the one wire, so this indicated to me, somewhere along the route between the internal lighting and washer unit the wiring forked. I also decided to take out all the interior bulbs/fittings to see if this had any effect on my battery monitor and OBC. The internal lighting did not indicate any problem as they all worked. However, by pulling the wires within the glove box did allow the monitor, (Battery tester) to show green lights instead of the amber, (This was with fuse 4 inserted within the fuse box). I can make a guess that this could indicate a problem with the wiring on route towards the windscreen washer, I will have to see if the battery is ok tomorrow, by leaving the fuse 4 in to see if the battery has been drained, failing that it may mean checking the wiring route through the dash, not something I am looking forward to, but one step closer to solving the problem....
16th May 2015 - I left the car over night with Fuse 4 in, it is now near enough 9:00am the tester is showing an amber light. I started the engine and ran it for about 30-45 seconds and then switched off the engine, the OBC reads from 12.9V to 12.5V decreasing to 12.2V and then 12.1V, I waited for at least 1 minute and this seems to be a12.1V constant. I removed Fuse 4 just to be on the safe side.
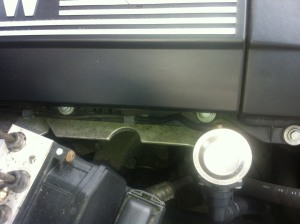
22nd May 2015 - Early afternoon, weather reasonably warm, I headed out to the BM to attempt to insulate the wiring behind the head unit (radio) and under the steering column and dash, nothing unexpected found and after two and half hours job done. No effect on voltage. I will need to check the windscreen washer connections, but not today. Started up the BM, seemed ok after six days standing. 23rd May 2015 - I have been meaning to replace the vacuum pipe on the O/S front of engine as referred to in an earlier entry, (p34) it had become pourous. Normally this pipe can retail at £7 to £8 from the dealership, can't remember how much I paid for it, I know it was not that much and originally it was for another Series 5 over a decade ago, I digress, I did find an 8" (21cm) length of braided, thin, narrow rubber pipe, width approx. 5mm, in the garage during a tool audit. Cut to length, with the old one discarded, the new one was pushed on with 'fingers force', (Note: the hose goes onto a thin plastic pipe, over time this pipe can become brittle and break if the rubber pipe is forced on or pliers are used, so care is needed. If there are any dead spots in the engine running, hopefully this has now sorted it, not that I have ever noticed any problems, it is just one of those jobs not totally necessary while the car is running ok, however once the porous pipe had been noted, will play on your mind until it is replaced or the car fails one day when urgently needed.
15th May 2015 - The rear door and card does not present any surprises, I decided to have a look at the front near side door again to check the condition of the wiring. The front door is a little more cumbersome than the rear and there are two screws holding this panel (see workshop for relevant images page 61. Be careful, as the 2nd screw is hidden, you may have to open the vent flap to see it. You will also have to take out three screws holding the speaker cowling, this allows access to the Gasket Seal and inner door. I checked the wiring at the door hinge, within the rubber grommet for breaks and signs of possible 'shorting' and continued to insulate the wiring with blue insulation tape. Once completed, the card is reattached, fiddly and with patience with a logical approach as with the rear door, job done!
The exposed screw can now be unscrewed and taken out, to be placed in a safe place, the lever cluster can be manipulated through the card and the card can now be lifted and pulled away from the door, Note: the push down locking mechanism, and clips, lift the card clear of them, trying not to bend the wire or knocking it out of position.
Most modern cars now have an inner ‘Gasket Seal', that fits in the inner door, this helps with weather proofing as well as sound proofing.(Early cars just had a polythene sheet stuck to the inner door with tape; if you were lucky! This helped to keep the carpets dry inside the vehicle and to keep water out). The 'Gasket Seal,' in my case was stuck to the inner door with a tar like substance, most likely Silicon. (Note: this can be re-used to stick the 'gasket seal' back when the appropriate tasks has been completed). Again, the open/close lever, needs to be pushed through the 'Gasket Seal' as well as any wires and connectors, before pulling the 'Gasket Seal' away from the door.The wiring was checked for breaks and splits in the insulation and re-taped up with insulation tape to make certain the wiring was protected from possibilities of 'shorting', contributing to battery drain.
I also found the wiring had been routed incorrectly causing the play in the wire to be on the short side. By re-routing the wire, allowed me more play in the wire and less chance of it being pulled or stretched too much to connect the courtesy light during bulb maintenance. I was satisfied this door was ok, checked the feed into the door and was satisfied that this was also ok. This left me with the task of reassembling the door and during this exercise, I fed the courtesy light connector through a minute or very small hole in the 'Gasket Seal,' allowing for even more play in the wire. The door has been reassembled in reverse order; eventually lining up the press studs before pushing them into the holes, (this prevented the studs from being smashed against the inner door and having to purchase new ones). This just leaves a further three doors to check.
12th May 2015 - Another nice day and I decided to see if I could find the problem with Fuse 4 - (Interior Lighting and Front Windowscreen Washer system).I started with the nearside rear door as I had noticed the wiring to the courtesy light seemed very short as if someone had 'worked with it', at some time having to shorten it. Taking off the card can be a little awkward if not familiar with it's layout. My approach was to take off the silver plastic trim just above the door lever, for opening and closing the door, and to unclip the sides by popping out the press studs, (keeping them attached to the card) at the bottom and the both sides to the door. There is one screw holding the card in place and that is hidden behind a plastic grommet at the back of the plastic cowling containing the open/close lever. The grommet can be prized off with a very small flat bladed screwdriver. The window buttons on the passenger arm rest and the courtesy light situated on the bottom of the door card can also be prised off and wired plugs be disconnected.
04th May 2015 - Further feedback concerning the battery problem, it has been, a what seems to be a fair while since the battery has needed to be charged. Since I have replaced the pillar lights and cleaned the alternator terminals connectors, inside and out, the BM has, dare I say...... behaved very well, I still have a second charged up battery in my boot, just in case. The car has had little use as I haven't needed to go anywhere other than the local town, so the problem may have been solved for the time being. Fuse 4 on the other hand does still prove to be a problem, so this has told me that there has been two problems - the interior lights, more than likely in the doors and the other a problem with the alternator internal connectors linked to charging the battery and maintaining its charge. Without the fuse 4, I still don't have the use of my windscreen washers. I can remedy this by identifying the interior lighting wiring and possibly disconnecting them from the fuse box and isolating them, thereby allowing me to reinsert fuse 4 and everything should be ok. Or by rerouting the live from the windscreen washer pump O/S to the switch on the steering column. This is something I will need to ponder on. I may decide in the warmer weather to explore further, it may only be a wire inside one of the doors causing the circuit to short. That is the problem with electrics, you cannot always put your finger on the problem straight away and you just need either the patience of a saint or lots of money to get someone else to look at it..49.
06th May 2015 - Just received a Battery/Alternator tester, for more details (see Workshop content page 3 or go direct... Specialised Tools E)
28th April 2015 - Another nice day and I decided to address another common problem and that is with the petrol flap area. Normally you have a metal protrusion or stop to allow the petrol flap to be flush with the body of the car, however this snapped off a few weeks ago, making the flap look a mess and generally the flap was resting on the petrol cap, the common reason for this metal to snap off is down to rust. For a while, now every time I opened and closed the flap I would have to adjust this piece of metal as it was weak and it eventually became brittle through friction and snapped off. I managed to find a right angled piece of metal off a shelf unit, (L shaped, two holes in each leaf). To rectify I unbolted the two nuts and detach the whole flap from the vehicle to allow drill access. (Note: I would suggest attaching the 'L' shaped stop with strong glue or tape to assess where the hole is to be drilled). By drilling a small hole, into the flap area, (well) or (near where the original metal came detached that would be on the left near enough lateral to the locking bar for the flap) - also noting you are in an area of a petrol tank so caution is advised i.e. heat, flame boom! etc.) The small drilled hole are for either a tapping screw or a rivet can be used to securely attach the L' shaped metal stop. I then used some waterproof glue to each surface before adding the screw and attaching into position. To finish off I used some rubber off an old bike inner tube cut to shape of the metal stop and stuck it to the surface of the metal stop, this adds protection to the inner flap when flipped open and closed and it doubles up in preventing the stop from rusting. I also noticed with the E39, the flap 'well' sometimes collects water, hence the rust and most likely the source of the problem. With an additional small drilled hole in the base of the 'well', you will find a small indentation an ideal drill spot, situated to the right of the flap hinge bolts, this should do the trick and help with drainage and prevent further water build up. If you have drilled slightly off the mark for the 'L' shaped stop, (as it can be deceptive ;)) it can be slightly adjusted by tapping with a light hammer, fortunately mine was ok... This now just leaves reinstalling the flap, in reverse order just attach the two nuts onto the bolts, adjust as needed and the job is done. The flap is now flush to the rest of the bodywork. (The rust treatment will be for another day). See workshop for images 59
27th April 2015 - A nice warn day, just had a delivery of a new addition, a horn system - 5 Sounds Loud Horn Siren Police Fire Warning Alarm Speaker Car Boat Van Truck, ok it's a gimmick, full 100W with 300db enough to makes sure people know you are there. Connection is normally straight forward with red and black for positive and negative battery or live feed connections and an extra wire to the microphone and sound generator hand piece. (Supplied and just clicks together and connects to the horn). I decided to install the horn under the bonnet, (hood)on the offside front wing shell, mainly for weather protection and easy wire feed access to inside the vehicle. By lifting out the o/s filter giving access to the master brake cylinder and a large rubber grommet giving access to inside the cockpit. The red and black wires are short so an additional set of wires are needed to extend into the drivers area. One can isolate the earth under the bonnet; (hood) however I decided to earth the black wire inside under the dash on the chassis. The red wire was routed to the cigarette lighter with an inline fuse (10w small blade) and scotchlok. The hand mic has an on/off switch. Tested briefly and system works ok.(See workshop Page 57 for specifications).
Ebay £3.43 (TomTop_Shop), Shen Zhen, China
01st March 2015 - Do you ever get the feeling, something or someone is trying to tell you something...I do and it is becoming more often than not! At around 3 o'clock in the afternoon, rain had stayed off, I thought I would have a go with the alternator as the job needed to be completed. I Started the job, managed to get the belt and alternator off again, the nut came off with my new extension bar, everything was going well, unitl I placed the pully onto the replacement alternator - the shaft was too short for the pully. The clouds decided to also tip their load and the winds increased to: 'blow the bonnet down speed', "what the H@~L?"
It just left one option - clean up and strip the old 90 amp alternator down and see what was going on under it's covers. - The bushes were good - Bearing seemed ok (See workshop).
However, there were dead leaves and that green colouring on the copper teminals and just thick dirt generally. I went to work cleaning all the terminals, using a wirebrush on a drill bit and they came up well. Re-angled the fan blades to their 90 degree angles and checked for noise as it rotated and adjusted accordingly. Put it all back together and thumbled for an hour trying to get the alternator and belt back onto the car. Tested it and it reads 13.7V to 13.9V on the dash computer. Just as I finished and by now a little wet, it stopped raining and the sun came out - Wonderful!
So to conclude: I am still using the 90 Amp Alternator, cleaned connectors and checked what I could inside the unit, put it all back together, fitted back on the car and will check out its performance and the battery charging ability over the next few days. (The 120 Amp will end up in the garage with the other spares until I need it, it will most likely not be used for this current Beamer unless I can solve the pully problem without having to pay out).
29th March 2015 - Its Cold, rain, sleat, Brrrr! Battery lasts about 23 days as the BM has not been used much and is still on battery rotation. Received replacement pillar lights to replace the broken one, pending.
6th April 2015 - A change in the weather, an unnaturally hot day today, a weird one, however not one to miss an opportunity I decided to give the BM a good spring clean inside and out, full wax polish and a good vac inside and wipe down of interior and you know those pillar lights on the number plate, the one I accidentally pulled the wires out, well decided to replace them both and slightly re-align the number plate. It
fig:eBay advert
Diary Entries
fig.
Headlights While I am waiting for the new sensor, I decided to change the headlight bulbs for the ‘diamond white’, I got them a week ago to improve the dull ‘goldish’ display that the headlights seem to have - code number 9005 and 9006, HB3 and HB4 HD Xeon White Diamond bulbs, original 55W and 65W changed to 100W and 65W. The 9006 fitted fine, (Toyota original). The BMW bulbs designed for the e39 did not fit, nothing unusual there for this project…I can only assume the supplier had them wrongly labelled. (Not the end of the world, managed to get a refund off eBay and kept the bulbs). After a few hours of procrastinating, I decided to have another go at trying to fit the non-fitting bulbs. After a lengthy time I used a small file and took out some of the material thickness and to cut a long story short, they now fit and when switched, they look good! (Be careful as bulb fittings are not universal on all BMWs, some models do not and some do have the appropriate upgrades to accommodate the newer Xeon bulbs. GPS Head Unit (continued....) Thought things were going well.... just had a customs bill for the GPS Head Unit I sent back to Hong Kong for 'repair' /exchange. Customs bill £62.12 plus postage of head unit £36.00. Unit Cost £235 total £333.12 expensive mistake and still nothing to show for it as yet, as the replacement has not arrived... Must think positive, must think positive, must think positive...... A couple of days have gone by now and the company have confirmed they have received the Head Unit, phew! They have asked me to pay an extra £10 for the current upgraded model appropriate unit for the e39, one must do what one must do…(The prices have gone up from £199 to nearly £290 in a matter of a few weeks, popular or what?). On sending the £10, they will now send me the correct Head Unit, (watch this space….)(Update Prices have risen to £450 to £560, so I don't feel too bad now).
Sensor (Continued),it seems New Sensor arrived, fitted and…..still a long beep, an indication that another sensor is down, it seems another order will be required, however this will have to wait as other bills will need to take priority.
New Day 1 - E39 - Fuses (Continued) I have decided to pull a few fuses : Glovebox - Fuse 9 - Air Conditioner/Heated Washer Jets Glovebox -Fuse 21 - Park Distance Control Boot - Fuse 76 - Heater Blower Day 3, battery remains charged and working todate. I Later returned these fuses as they didn’t seem to be the cause of the drain problem… (However still a little dubious). - Car loses Acceleration with revs to 2.5 to 3K and nothing above this level.
30th October 2014. Day 4 -While I was contemplating the 'rev' problem, I decided to change the steering fluid, a fairly straight forward maintenance job, I pulled the hose off the bottom of the reservoir and bled the fluid for disposal, reconnected the hose, tightened the clip and topped up fluid. Bled again, process covered three bleeds to clean out the system and obviously three top ups. Switched on engine, turned steering fully left and fully right four times to help get the air out of the system and power steering should now be ok, in my case luck was changing, works well. (Slick 50 - Halfords £6.99).
Poor Acceleration Going back to the problem with the engine self generated revs between 2.5 to 3K, I can only explain by using an an analogy: One would be lucky to travel 30 mph with a foot fully down on the accelerator, my heart sank and I must say I came very close to tears. Hours of searching the forums and watching countless YouTube videos, I came across a 25 minute video that could have been explained in 5 minutes. However there is no way I am complaining, as it saved me a great deal of expense. The video suggested the rev problem, could be to do with the EDU and a corruption in its data and therefore would be required a reset, to one can only assume factory settings, as this was not made very clear within the video. I needed to take apart my K&N Air filter to clean the MAF and Sensor switch using an air blower, (my mouth) and checked the vacuum hoses. There was one small hose, that looked a little latexy and dodgy, a small thin hose on the o/s (right) of engine compartment, it seemed to have a reasonable seal, so I decided to leave it for the time-being, this will need to be replaced at some point.. Note: Any work on the Airflow may cause a REV problem - I followed the instruction from the YouTube Video:
EDU Resetting to Factory Default
1. Insert key into ignition to 2nd position (with illuminated icons) 2. Push down on Accelerator pedal for approximately 5 seconds 3. Switch off ignition for two minutes (leave keys in ignition and stay in vehicle) 4. On two minutes, take out keys from ignition and replace them back into the ignition 5. Start the vehicle 6. Pressing the accelerator, the Revs. Should now be pushing your needle all the way around 7. You will need to go for a five minute drive
The engine Revs on completion, should now be ‘normal’. On hearing the engine revs go around the clock was music to my ears and I paused and dropped on to my knees... saying 'Thank you, thank you. Not sure what the neighbours thought of it. 'The five minutes’ drive is to establish the running data. Personally I found the car to be perky and I was ecstatic with relief to know I was not going to have to pay hundreds of pounds to sort the problem out, (I recollect paying out with an earlier 5 series I had, the garage saw me coming). Hope this solution helps those that find they have the same problem, it worked for me.
Another option: Try allowing your battery to go totally flat, I found this allowed the ECU to reset to default over a period of time and on reconnection of a fully charged battery, the BM started and problem was solved.The secret is to allow time for the unit to default. Note: Just disconnecting the battery may not allow the sensor to pick up the low battery current and may notallow for the default process to initiate.(updated: 25.03.16)
Reverse Sensors - After previously fitting a new sensor for reversing and placing the gear into reverse with ignition on, I still found the sensors were giving off a continual bleep, (again suggests not working properly) so, yesterday I checked the sensors using a stethoscope, (one I had in the cupboard) to check for a clicking, this normally signifies they are working. It seems the one I bought previously was working and clicking ok, the remaining three on the other hand were not and obviously needed to be replaced. (I had also placed them into the socket that I knew was working, again no clicking). To buy three more sensors was at this time not possible, financially and would have to be done on a gradual ongoing basis as sensors are not cheap. One can only assume the good sensors were taken out upon sale from the dealers I got it from….assuming that... B@~#?rds... When the Head Unit eventually arrives I will most likely use the reverse camera I fitted earlier in place of the sensors until they are replaced.
6th November 2014 - Head Unit - Head Unit arrived yesterday for the BM, (D51066E ordered months ago on sale of the E36) now loosely fitted, had a few problems, aerial lead required an adapter - pending (99p EBay) and the unit required a few attempts at getting the reverse camera to work, in conjunction with the reverse gear, (the wires seemed thin, and required connection to the reverse lamp, positive and a local chassis bolt for the earth, (now the camera wires were coloured red and black). The camera’s thin wires are not the ideal thickness, had to triple up and used insulation tape to keep the wire together and enclosed it in the scotch lock) works now, GPS had to be set up, some reason very little instruction came with the unit, but all in all, I believe I am slightly brighter than a chimp so managed it, just! - (ended up borrowing a chimp from a local zoo, (my attempt in humour) all seems ok.
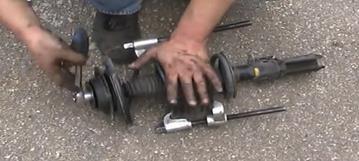
Strut & Control Arms (continued saga) Ok it's Saturday, and one not to let a strut beat me, I decided to carry out the work on the O/S. This strut came off easier, as I was more familiar with the procedure and was focused on what I was doing. However, I did find the spring and the strut were not a matching set, one was a Sachs and the other a Monroe, I believed they were both compatable for the model of e39, so I continued with the job. When compared, the N/S strut, fortunately was not sitting correctly, so any shortfalls were made up on the repositioning of the spring rotationally, I did need to drop the control arms to get the Strut unit back into place within the wheel well, the spring compressors worked well first time, new rubber and gaiters were fitted and all returned to the vehicle, bolted and done. Also rubbed off the rust on the brake pipe and undersealed (both sides O/S & N/S) of the wheel wells. This only left the emergency brakes and under seal on the backof the vehicle, a job for another day and not too urgent.
fig. Source - Front Strut Assembly fig. source - use of compression clamps
Emergency Brakes - (Hand brake) Next job was the Emergency brakes or parking brake (UK), found the adjusters on the wrong way around, corrected replaced fairly worn shoes and greased adjusters, three notches on the handbrake, as good to go - not straight forward though - there were problems with pad retaining bolts, spring attachments and adjustments, like all the jobs on this vehicle so far, a right pain...fortunately all working now.
Note: There are two sets of brakes on the rear of an E39. Handbrake shoes 1/3rd the size of the standard shoe, this is housed within the wheel drum. The replacement shoes, (also used on the BMW ‘Cabrio Alpina)’ for the parking brake and standard with appropriate sized BMW brake pads for the 520i are generally used. In addition to the replacement, I did manage to under seal under the rear of the car, messy job. . Plastic Boots & Control Arm (Continued) Next job was to replace a control arm, plastic boot on the N/S rear front (upper wishbone), I did notice when replacing the brake shoes and I mentally noted to sort out interior lights and washer motor to find out why it is causing a battery drain - suspect bad earth somewhere, either on interior lights or washer motor - not too urgent at the moment as everything else is working ok - (not too loud). Would like a professional ramp to use, the job is made difficult crawling around on the cold, wet gritty floor - can't see that happening very soon, unless I win the lottery....one day, I digress...
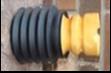
Plastic Boot and Rubber
Make sure you put the rubber stop on the right way round, Rounded end on top, I will correct mine when I replace the front Struts with new ones in the future.....the original I took off mine seems to have been on the wrong way round, I did wonder why I needed to tak a sharp knife to the rubber to slightly reshape it to get it onto the stalk of the shock. It was fitted incorrectly and I never thought about it until the job was done...B@=L''Ks.
Battery (Continued) I ended up replacing the battery, takes 100Amp with a CC (Cranking or starting power) of cc960, battery lasted seven days, may have lasted longer if I hadn't put the suspect fuse 4 back in, battery required a full re-change. I am now thinking it may be the Alternator against all other better judgment from previous tests. It is a standard 90 Amp, may change it for a 120Amp, I will see how it goes….
Drive Belt(s) or Fan Belt(s) In the meantime, I am changing the drive belts. The E39 has two belts, a ‘serpentine belt’ for the block and alternator and another for the cooling system or AC. Another possible cause of battery drain, belt too slack on the alternator causing the alternator to not generate an appropriate charge... Never straight forward, changed them on Saturday 04th Oct 2014, weather was sunny for a change. Tried to take the radiator cowling out, thought I may have to take the radiator out also and obviously disconnect a few hoses, oh! And not forgetting the fan, normally the first to be extracted with the right tools etc. The cowling only went down to the bottom of the radiator with 'only a cascade of hoses, clips and kitchen sink. All these were attached! After pr@"ing around giving the impression I knew what I was doing, I ending up breaking a few clips on the way.
I decided to change the belts with the cowling loose and the fan in place based on not having the correct tools for the fan. I commenced, by getting under the car, taking off the front under tray, this gave me access to the retractable tension pulley nut and with a 16mm socket adjusted the tensioner and detached the belt, (access was easier for this one,the tensioner was near enough below the radiator. I Did the same with the Serpentine belt using the other tensioner nut next to the alternator. (a little more fiddly with hoses attached and required some grunt). The latter belt was in very bad shape, (cracks and merged grooves). The former or AC belt seemed ok, however I decided to change them both.
Using my drawing (drawn prior to taking the belts off, a MUST! (This helps with memory), I spent a good 20 minutes getting the new serpentine belt back on, what a pain in the #@?#. Ideally, the job is more suited for an Octopus with a
fig: N/S Brake Hose
fig: Control Arm Boots
fig: Two Handbrake Cables
Handbrake adjusters (Nuts)
Hand Brake
19th June 2015 - Yesterday the sun had got to me and I was bushed through dehydration. Today, however I was ready to tackle the handbrake. Rear wheels off, car mounted on jackstands, unbolted the cable on the handbrake, couldn't see the cable connection bracket so assumed it was under the vehicle and some models vary, depending on the year of munufacture. With a crawl under the car and a lengthy search I could just identify the brake cables entering into the bodyshell, there was body mounding all around them and no bracket. I decided to rip the centre console out and trace the cables back, having to split the carpet on top of the tunnel to get access, (not ideal) only to find the cables came in from under the car through the moulded silicon, (situated centre on top of the tunnel just at the point where the back seat meets the tunnel) from this point the brake cable seemed to be fed through two tubular steel pipes to the handbrake lever. For the job to succeed It required the moulding or dried silicon 'splat', (done during manufacturing, one can presume) to be broken or at least some holes made for the new cable to be threaded through. At this point, I decided there had to be a better way of sorting this job out. I moved onto the O/S hub, stripped the brake mechanism down, cleaned, re-greased and put it back together again, adjusting the brake shoes, checked for wear, not much, as they were only put on later previous year, so adjusted the brakes enough to beable to just get the hub back on. (Note the handbrake should be on at least three clicks before the hub is replaced). I did exactly the same with the n/s brake hub.
(Note: when stripping down the handbrake inside the car, I had unbolted the actual handbrake and taken off the small nuts that were on the cable adjusters. Putting them back was time consumming, however I did notice there was a change in the length of the cable - it seems to have reduced considerably, even when tightening up the adjusters food for thought when refiting the cables, the hubs have taken up the slack and may even extend the life of the cable?). A word to the wise for those people who are not in the know, E39's are renowned to having a poor handbraking system, so don't feel too bad if your brakes can't be adjusted to some garage requirements, this is just another means for them to get some more money out of you, check out the comments in internet forums, makes interesting reading. (See Workshop p64)
4th July 2015 - Both Brake Sensors have now been fitted O/S rear and N/S Front, this has not addressed the red light issues on the dash and further work and investigation will be needed concerning the handbrake adjustment to reactivate the sensor. This will be done another time when the mind and body are synchronised.
23rd July 2015 - A slight intermission here............, as I know friends and family sometimes read this diary and is useful to make a point without having face-to-face fallouts. (I recommend having a site just for this purpose). Over the past few months, I have searched to find my mechanics tools only to find they have walked out of the garage without being helped into oblivion and my toolbox has been depleated, I have gradually being purchasing tools to fill my maintenance needs and gaps in my inventory. These purchases and information can be found within the tools section as and when, showing researched prices aimed at those living on a low income, more will be added as time goes on. (Note: I have decided to lose a few more friends and even family if needs must, by not loaning my tools out, and yes I can hear and see many of you, grunting in agreement, familiar with this rant as in many households and neighbourhoods. I have estimated total value loss of loaned out tools, parts and equipment estimated at around £12K, unfortunately, some can not or will never be replaced). For some this figure may be a drop in the ocean to just keeping the peace, however, I don't have that luxury and I will no longer subsidise those in good jobs, in these days of austerity, so hopefully I have made my point. OK! There are those finding themselves now offended, one can only suggest the return of my items and for them to dig deep into their own pockets, it may be a new experience. Nice to get that off my chest, a weight has been lifted for now, at least...
[eBay £8.95 rtgroup11] Normally there are only two sensors one on the front and one on the back axle braking system. In my case they are both situated on the N/S of the vehicle.(See p16b)
After going through trial and error, eventually the wheels were back on and bolted up and the car was off the jack. By this time it was late afternoon. A final check of the brakes (Note: You will need to pump the foot brake a number of times to reset the brake plungers and check the fluid levels). The only thing I noticed was the dash light remained on. Another point during the jacking up and down of the vehicle, I didn't mention was, I did hear a sound that no one wants to hear, the jacking point creaking and crunching and a few cracks in the sill paintwork appearing like a spiders cobweb. At this point, I had had enough it either past it it didn't. 22nd June 2015 - Today 10 am, the BM roled into the garage for an MOT retake, hope wasn't high as I didn't expect it to pass, based on the premiss that I wasn't happy with the way the repairs went, namely because of the handbrake, red waning light, remained on, displayed on the clock cluster. The rubber brake pipe and handbrake cable hadn't been replaced and so on... I did mention to the garage, the brakes had been adjusted, however the light remained on for some reason, could be a sensor. After around what seemed to be an eternity, (half an hour) I was informed it had passed. They had checked everything and told me directly that the brake had stopped binding, the brake pipes have some corrosion also. Weird that! Mind you I did have to pay a retake fee....Garages in general, definately work to an agenda, what that is, one can only guess.
23rd June 2015 - For now, back on the road...I have an idea I may need to drop this vehicle soon...
26th June 2015 -The red light on the dash is still on, and I know I may have damaged one of the sensors, after an extensive search and a good laugh over the silly money some companies are asking for just one sensor, I have managed to find a company selling two for near enough the price of one:
Do you like my new sign?
Just the job!
29th May 2016 - with standing green slime washed off and looking presentable, not bad considering it's age....
16th November 2015 - It has been a few months since my last entry and up until now my beamer has required little maintenance, however the day comes when one senses something is not right when the engine turns over and the car kangaroo jumps up the road with little acceleration. When other drivers start honking their horns to get you to pull over so they may pass, the situation becomes embarrassing that something needs to be done. The problem or symptoms with the engine is not the starting and it doesn't seem to be the starvation of fuel, even though there is little fuel in the tank. With that in mind, it could be the fuel pump or it can be the spark plugs. If the car has been standing a number of days on a slope, fuel may need to be pumped towards the engine to the carburettors and fuel injectors. The other option is bad plugs, probably needing to warm before the plug can generate a spark, the misfire or lack of acceleration could be down to a damaged central electrode or the plug is dirty, or the gap between the shoulder and electrode has closed or opened from the specified gap causing mistiming of the spark. Obviously, the easiest job is to check the plugs. The spark plugs are situated on the offside of the engine under the plastic panel held on by two nuts under two' facing' caps. When the panel is taken off, one is faced with six almost square electron ignition units, each one bolted over each of the spark plugs, with a heating element, these will need to be removed one at a time. As each spark plug is removed and checked, cleaned and replaced (This prevents mixing or returning the leads incorrectly as this will cause the engine timing to be out of sync). On inspection, the plugs seemed ok until I noticed the central core element was flush to the base of the plug and after checking each plug in turn they were all the same and literally worn out. This meant the spark was not striking the centre core element of the plug and causing the engine to lack power and misfire. So a new set of plugs were the order of the day. I checked the prices and they varied from £17 to £56 for a set of six, I chose Bosch at £18.35 an unusual cheaper option, with the four shoulders rather than the one shoulder type to guide a better spark. Hopefully this will solve the problem, pending the correct sized plugs are delivered, I am now having doubts that the sales promotion was correct, it did say E39, we will see…..
19th November 2015 - The Spark Plugs have arrived this morning, six in total and they seem ok and they look to be the right size and guess what? I have looked out of my window, it's raining, it has been for a few days now, well.... kettle on! The job was not going to do itself and there was a window of opportunity, no rain, "so out into the breach my friend", to coin a phrase. An hour on or there abouts, Job done! However, there is still the same problem, the old plugs worked even though they were worn, so this could mean the fuel injectors are at fault or it could be the CPU or fuel management system needed to be told to stop compensating for the duff spark plug. The next task is to take the car for a run to see if that does the trick and the system resets itself, well its worth a try.
02nd December 2015 - Over the Christmas period, I have checked the CPU and reset it a couple of times to no avail, I have decided to take off the K&N filter and replace the original this job is pending until better weather. Tried moving the Beamer and it will only travel at a crawl 2-5mph to an off road parking space, this could be an indication that the clutch may have gone, however the gears seem ok.
06th December - After a long thought and the fact I need some form of transportation I have now decided the time has come to drop the beloved Beamer. I will replace some of the upgrades with the original parts like the filter, radio etc and put it up for sale as spares or repair, unless I can get it running properly, this will end a chapter SORN... and perhaps start a new one for another vehicle...
My Replacement: A Mazda RX8 Evolve - Look out for my next publication!
22nd May 2016 - Well back again and a surprise to me, the BMW may come out of Moth Balls to go back on the road. Seems to be the best of two evils, as the RX8 has proved more unreliable than the BMW, with it's over endurance of drinking fluids of all kinds problem -' a car alcholic.' The RX8 is now SORNED and garaged and the BMW is waiting a document update before reuse, so watch this space!
28th May 2016 - Wow! That was a slight blunder on my part, the Beamer is now taxed, insured and MOT is valid until late next month, so the Beamer is back on the road, there be it with a short MOT. The blunder was taxing the Beamer in the latter part on the month, this made me lose near enough 1 month out of the 6 months worth of tax, as the tax was from the 1st of the month - that's life it seems within a corrupt system, not pleased to say the least.
14th July 2016 - the MOT as mentioned was short, due on the 21st June 2016, I had let the day pass into July as I was not really using the vehicle until I found myself having to catch a bus through public transport. Being near enough out in the sticks or let us say placed within an awkward location, it has not been fun. It is strange how many garages will give you quotes for work not needed and it proves how corrupt the system is now. However, through a new neighbour, (recently moved in next door to me) their family member Paul, suggested a garage that was more honest than most, about twenty minutes away from my home location. I was dubious, the car was tested with just a couple of small verbal discretionary adjustments with a complimentary comment to the condition of the BM. This raised my enthusiasm and with a new fresh MOT, I have at least five months to think about the BM's future, as this is the length of the current tax. The garage seemed interested in it, so there is light at the end of the tunnel.
On the journey home from the garage I did notice the door courtesy gong was sounding, normally I don't hear it and assumed it had been turned off by the previous owner, so it was always a suprise to hear it and I did notice a trend. On my last MOT, the vehicle was raised on the garage ramp and lowered a number of times and then continued to the rolling road for brake tests etc. Most likely coinsidence. This could have had something to do with the problem, possibly a pinched wire somewhere or an earth problem. On leaving the garage the gong continued to go off every-so-often. The same thing happened this time around on leaving the garage, seemed very weird. Contemplating this issue, I concluded that FUSE 4 when returned to the fusebox, (remember this was taken out due to the battery draining quicker than if it were left out), I could only see a couple of functions for fuse 4 and that was for the windscreen washer pump). It may also be responsible for this gong sound, spliced into the wiring. Something to investigate perhaps... On returning home, I decided to disconnect and reconnect the battery, to see if this could reset the circuits, failing that I would have to take out fuse 4 again until I can find time to re-route the washer to an independent circuit. The gong? Well the last time it went silent by itself, so it may do that again, I will check it out the next time I use the vehicle. After a few days, the door gong continued to sound to the point, I decided to disconnect the damn thing, could'mt be dealing with it. Guess what? The battery stayed up......
07th August 2016 Into August and I decided to take the new neighbours to the local boot sale in the area and everything seemed ok with my beamer, battery was staying up, red brake light still on, but nothing untoward. Until! My guests and I, decided to leave the boot sale, to add, I had just bought some cheap imperial ring spanners and hand drills, for a tenner what a bargain.... On the way out towards the exit, someone wound down their window and told me my rear offside, (drivers side) wheel was falling off. I did feel something in the steering and a slight resistance as I was moving forward prior to this person's input. On quick inspection and a traffic jam behind me, I managed to pull in, onto a grassy verge. One can describe it as like the 18 wheel or the lazy wheel on an actic truck raised in the air and the Beamer running on three wheels, one can only sense the sesation at the pit of one's stomach.... What was the diagnosis? Broken axle? Control arm? Ball joints? Bushes? The only way to find out was to get my guests out and jack up the car. Car jacks are crap! There I have said it! I had damaged the sill, but eventually jacked the car up after loosening the bolts on the wheel and finding a firm surface, (Boot board mat) to rest the jack on, to prevent it sinking into the grassy, soft surface. With wheel off, the diagnosis continued. Axle seemed ok, that would have been an expensive repair, the control arm looked a little suspect, the rubber was broken and the joint very dry. The tell-tale sign is the slight bend in the hub brake dust plate, where the control arm had hit it, telling me the Control Arm was the problem, broken, without resistance, was forcing the wheel outward. A bigger problem was waiting.... how to get my passengers back home? Someone was looking down on me and some friends of theirs had just visited the sale and was on the way out. The new experts inspected the damage and decided they would take my guests for a sandwich and a cup of tea. Leaving me chewing the fat over my predicament as I needed to order a new part and no! I was not with the AA. There was nothing that could be done other than replace the wheel and lower the jack. An hour later, they returned and offered me a lift, accompanied with the 'expert' advice. I humbly thanked them, well! I was getting a lift back home. After searching and being messed around with ordering parts I managed to get a new control arm from eBay. One Rear O/S Control Arm £28 from [ziggy-a2z] adding £10 for express delivery. If I had ordered it the day before instead of listening to others, I could have saved £10, and a couple of days however, that's life and they meant well at my cost. 9th August 2016 I was a little concerned leaving the Beamer where it was as vandalism is not unusual nowadays. With a new stock of tools bottle jack, my neighbour’s son offered me a lift to the vehicle. (I was hoping he would help me with the job, but no such luck there and he hastily departed. Wheel off, further inspection. Over the two days of resting, the ball joint had broken out of it's socket on the Control Arm, a little poignant as my mother has gone in hospital for the same reason, to do with her hip, but I digress. The arm itself was easy to disconnect with the use of a crack bar on the bolt and nut. This just left the ball jointand the thread or shaft attached and bolted in the housing (see Workshop). Not having anyone to help me, I did find myself without a couple of vital tools and transport, a nut splitter and ball joint retainer or remover as some may describe it. This required me to walk to the nearest retail motor stockists to purchase the tools taking a good hour of my time and a chronic bad back didn't help too much either. Eventually the job got done, however not totally plane sailing, (see workshop page 66 & 67).
05th February 2017 - You may wonder why no more entries until now, without tempting providence, the BM has behaved itself reasonably well, even taken it a few long rides, note I am whispering, lets see how long we can go.... 08th May 2017 - Well it's this time of year again, and I am looking ahead to July to renew the MOT. I have decided to renew the brake system. Brake disc and brake pads front and back with new sensors
Brake Discs, brake pads, warning contacts front and rear 5 5ER E39 520-525 eBay:[nb-parts-de £93.25] German Parts nb-parts-ersatzteile
fig: Brake Set
DSC (DynamicStabability Control) or Traction Control System
Since my back op in January of this year, getting under the car has put me off a little as getting up and down has proved a problem, so getting help from family is order of the day, hopefully this will take place from the 16th May. I am hoping to also fit new brake cables, as you remember I did have a dismal attempt of fitting them before in June 2016 and ended up leaving them off. It scraped through the last MOT with the red sensor light on the clock cluster illuminating and it was put down as a bad sensor, (Cough)! The brakes have worked ok up until now and could probably go on for a few more hundred miles. New wheel discs/rotors require new brake pads, the shoes have had little wear, so they should be ok. I still need to use the vehicle, so replacement is the option...(watch this space). 16th May 2017 - A good early start 9:30am, after driving for just over an hour to my son's house, he has kindly accepted to help me, a cup of tea and then straight to the job, jack up the car. Since writing this diary, reader's will be aware that it has not been easy; maintaining this beamer in short or half quantities and we have been through this routine before. Today we are going to attempt the replacement of the handbrake cables. The connections to both the hubs on the back wheels to begin with. We disconnected the old cables from the handbrake lever end and pulled them through and out from under the vehicle. Note: be aware of the retaining clips holding the cables to the chasis and where they are situated and placed under the car, they will be needed for the new cable refit. Our biggest problem, as I had experienced before was the release of the cable from the rear hubs, they were stuck solid and would'nt free the last time I tried to release them last year, hence leaving it for another time. This year, I don't really have much of a choice, but to replace these cables. Like before, I undid the bolt at the back of the hub, thinking there was a retainer lock holding in or clamping onto the cable, as an extra security feature. With this model, it is not the case and the bolt can be left alone.(Note: it can take up to an hour to get these bolts out). However, the cable was very difficult and stuck solid, (this was down to having two different metals in contact with each other, aluminium oxidising with the iron, through weathering and pressure. With this type of scenerio, it just requires some brute force to realease it, (see page 64 to 65b for update and procedures). To re-thread the new brake cables, we did have to cut off some of the metal thread from the cable thread end that fits within the handbrake leaver, this allowed us to feed the cable through the tube leading, to the handbrake mechanism. The extra length prevented the smooth navigation through the tube however, by cutting the length slightly, made the task much easier. (We wasted a lot of time before realising what needed to be done - check the length of the thread on the old and new cable for comparison). Another problem was with the handbrake dash warning light that kept coming on. I did find with my previous attempt of sorting out the parking brake/handbrake, that I had bent the sensor switch during the re-installation of the centre console and this lead to the switch making permanent contact, illumiating the dash light. This was rectified and now the light goes off when the handbrake is released. 29th May 2017 - (Bank Holiday). I decided to arrange another visit with my son, to try and iron out faults discovered over a period of a few weeks and again, had an early start into an hour long or so journey. The weather was a mix of sun and rain, not too bad as the day went on. On arrival, a cup of tea, (the latter is very important) we started to sort out and refine the handbrake settings. We also needed to drill out one or two screws, we did try to partially remove it, (Star or Allen Screw Retainer on the hub on the last visit , so we could get the rotor off). The new wheel disc/rotor needed to rely on the wheel nuts to keep the wheel disc temporarily secure until a new star retainer bolt was sourced. The other drilling we needed to do was with the dust plate on the front nearside wheel. (Note: or a tip, when drilling out a screw or bolt, it is best to start off with a small drill bit and increase the sizes of the drillbit, until you have made it through. By doing this, you can watch for the emergence of the thread and the original diameter of the hole, hopefully not destroying the hole or it's original thread. The debrit can then be cleaned out and a replacement screw or bolt can be screwed in).
We re-adjusted and re-attached the heat shields, we also checked around the propshaft and boot/trunk area and added oversized washers where there were holes and missing bolts, including the ones on the dust plates. We then preceeded to bleed the brakes, this was straight forward . We also worked on trying to eradicate the noise or the scraping sound that had emerged over a number of weeks. I almost left out, we had rewired the front brake sensor using pressure connectors. (Previous owner attempted a botch up 'repair' job). Everything went well, we sorted out the sensor light problems. On the way back home the scraping noise returned. The only explanation after contemplating and analysing the events of the day was the handbrake cables may have slipped their retainers, or part of the heat shield was in contact with the propshaft, causing an unsettling sound. Another job and another time to explore and one needs patience....We cleared up around 6-7:30pm 17th June 2017...and another visit and an early 6am start to my son's place an hour away, I just couldn't stand the scraping sounds anymore and patience had run lower than low. The noise only sounded as one built up speed or on a turn. The faster one travelled the less one would hear the sound. It appearered, there were two possible scraping sounds. on arrival and all-important, a cup of tea, we decided to strip away the centre console so we could pin-point and identify where the sounds were coming from. We came to the conclusion, it was definitely coming from the centre of the vehicle, the sounds were also coming from the nearside front wheel, so difficult to claify. We jacked up the front nearside wheel and inspected the dust plate and concluded that we needed to place a washer onto one of the plate nuts. We seemed to have missed this on my previous visit, or the plate had split. We did notice some attached pieces of metal, fixed by fine rivets in the form of a framework, connecting to the dust plate and we decided it was a problem waiting to happen. The design was mainly to detract foreign matter away from the brake fixtures, however the rivets were detached and a possible problem. There were retaining nuts on the dust plate to keep the plate securely fixed to the hub.The rivited piece was an add-on, so we decided to discard the framework. (We were satisfied this readjustment was safe and would possibly solve the problerm of one noise, at least). We also checked the wheel bearing by pushing and pulling the wheel towards us, as we faced the hub, as this could also be a source for a scraping sound. There was no play and we were in agreement that the bearing was not the problem and the wheel went back on. On releasing the jack, we decided to place the car onto two portable ramps at the rear. My son checked underneath the vehicle and did a good search for the problem. This took a good half an hour. (Now this is where experience comes into play. My son looked and couldn't see anything out of the ordinary, (bless his cotton socks). I decided to have a look, along the propshaft and the route along the tunnel, following the the handbrake cable, towards the rear hubs. Now these cables are covered in an armoured tube casing and can be bent or pushed into place and it retains its shape, they were placed in or to follow along the tunnel of the propshaft. With one's fingers, one can feel for the space or clearance between the prop and the cables. I had also noticed scoring around the aluminium propshaft, as the black paint had scraped off squarely. With a push and a tuck the cable was repositioned away from the propshaft and we were satisfied that this problem was now fixed. It was time to refit the centre console and this proved to be very time consuming. We tested the BM and the scraping sounds had gone, It felt like a new car. On my return home, that day (5:30pm) I did notice the handbrake dash light was remaining on to my disappointment, fortunately the following morning, I poked a screwdriver onto the sensor, just enough to adjust it's position slightly and the problem was solved. The light went out on the release of the handbrake. The BM was now ready for a good clean, inside and out and this would then leave the vehicle ready for its MOT in July...
30th June 2017- Since my last entry, I have noticed the ABS light occasionally illuminating on my dash, I am hoping it just needs a quick clean.To be on the safe side, I have ordered a new rear ABS sensor. However, there maybe more than one that needs replacing." Cross that bridge when I come to it".(Note: It is best to replace ABS Sensors with original manufacturers spec, than the standard off-the-self OEM. After reading some forums, many have had problems, some with sluggish or unusual clicking sounds and others with problems with their cruise control.OK! I went with OEM, it was cheaper, and I had a gut feeling!
.
I decided to order another rear ABS sensor from motorsportplus at the price of £9.99 eBay and it arrived on the 5th July, tried to fit it, however the old sensors were stubborn. I left them for the time being as I had other personal matters that were taking priority.
I then ordered a front ABS sensor , again from motorsportplus for £9.98 from eBay. I did think they were on the cheap side and there were others twice and three times the price, on inspecting them the quality seemed good. I fitted the front ABS sensor on the O/S wheel hub and broke the five star screw on the first turn. Fortunately there is a second hole on the hub to screw a thread. With two hole available, one can conclude that this is quite a common accurance. I needed to order a new screw, (x2) needed to be ordered and could only be obtained from BMW stores outlet. I was expecting the screws to be around £20 with Vat and the extra brand costs and greed etc.
fig: Rear ABS fig: Front ABS
To my surprise, BMW came through with a price of £1.98, and I picked them up the following day before the MOT . By this time it was the 12th July 2017. My car was due for it's MOT on the 13th and I needed to decide on the garage. The year before, I had taken my BM to a garage in Kings Norton, they had proved reliable, so I got my neighbours son to book it into the same place.
13th July 2017 - MOT day and my neighbour left it to the last minute, the ABS was still playing up and I thought the headlights looked a bit of a mess with condensation. It was the 11th hour, so nothing more could be done. I drove it onto the garage ramp, fortunately the ABS behaved itself during the test and the car passed with a verbal advisory. The headlights needed replacing. I assured the examiner this would be done. A New MOT was the order of the day.
To my word, I ordered the new lights on the 17th July 2017 from [eurowagensltd1 - eBayfor £95.99], seemed the cheapest complete units anywhere and they were delivered on the 18thJuly, quick or what? Headlights set for BMW 5 Series E39 1995-2000:
- Headlights set with orange indicator - Body type: Saloon Estate - Sold as set - driver and passenger side - Direct replacement part, error free, plug and play - Bulb type: HB3/HB4/P21W/W5W - Bulbs not included - Motor not required, suitable only for manual adjustment - Fully E-marked and road legal, will pass MOT - Premium aftermarket quality part - not genuine - For RHD vehicles only - with steering wheel on the right side - OEM part numbers for reference only are 63128375299, 63128375300 - Covered by a 12 month manufacturer warranty They even had the plastic plugs in the top of the units, I can forget to old Gaffa tape:
So, fitted the headlights straight away and very pleased with them. I still need to sort out the ABS and perhaps tidy up the bodywork a little. ....What I did forget to mention was the noise of the handbrake cables scraping on the propsharft, this noise returned, even after all the adjustments. I decided to venture under the car again, after placing it on ramps at the rear, I checked the rear ABS, I decided to leave them for the time-being. I tied a number of plastic ties to the handbrake cable and the vehicle framework, the control arms, observing possible obstructions and this was in addition to the ties I had previously used at my sons place. So far so good, no more noise...
31st July 2017 - The ABS light is still illuminating when they decide to, so I have concluded it is an electrical fault and I have ordered another rear ABS sensor from [motorsportplus- eBay 9.99 free p&p]. This will compliment the one I had ordered on the 6th July, that has not been fitted yet. This will be my next job to replace both the rear ABS sensors on the vehicle. I will most likely solder the front nearside twin ABS terminals, on the botch job of the previous owner to make sure there is a good electrical contact. Hopefully this should solve the problem. Watch this space....
August 2017 - Rain rain rain....Oh! and Motivation.... The replacement sensors has worked to a fashion, the off side front sensor has proved a problem and is intermittent .
17th April 2018 - The Beamer has proved reliable and has become the work horse, there is still a slight problem with front offside wheel sensor, and one can live with it. I had to replace two rear tyres due to rapid wear of soft rubber tyres, (check section on the purchase of tyres) during the snow and ice period a cost of around £142, (Plume Tyres) valve and balance. My advice would be to get an all year round tyre if funds are available and perhaps a different make.
14th July 2018 - The e39 has been running well and managed to reach it's MOT anniversary this year, so has another twelve months. This motor is now ready to move on to a new home and will be placed on the market. Will be sorry to see it go....
12th November 2018 - I know I said the Beamer was ready to move on, however I have hung onto It, up until now for an extra four months. This is mainly because my replacement BMW Z3 was far from being fit for the road and needed many replacement parts, money and time to bring it up to standard. The E39 is not going to the markets in the sky, but over to my son as he is in desperate need of a reliable vehicle to get him from A to B. The RX8 proved a bit of a disaster and less said about that the better...After a chat about the car and his circumstances, he is now going to continue from where I left off and hopefully will give the E39 a new lease of life. So far he has plans of a: Body wrap, new leather interior, as well as some maintenance that has recently emerged, such as the Heater blower has failed, (Hedgehog) and the accelerator pedal fitment has also failed, (this is a piece of plastic that attaches to the pedal), and there is the fuel filter, also needing replacement. It is almost as if the BM doesn't want to leave me...(yes, right!) If and when I get updates, I will enter it into the diary...
06th February 2019 - Perhaps I am right for a change, more jobs have emerged since the e39 and I have been apart, problems with the emissions and just generally the engine running and performing badly. With investigation, it seems the problem is coming from the radiator thermostat , check out the workshop section for further details...
07th July 2019 A number of months down the line and I was informed today that with the costs of new parts and replacing old parts with more components failing, the E39 has come to its end of its life after careful consideration. The E39 costs have got to the point of becoming less cost effective and another vehicle will be sourced. It will be slowly dismantled and sold on for spare parts. This closes a chapter.
To Workshop Pages:
Please View Using MS Explorer or Edge as other browsers may cause text/image overlap