© Copyright Reserved - United Kingdom
Ideal Screen Composition 1024 x 768
5 Series Beamer
fig. Boot - Rear Fuse Cluster
59
58
Workshop
Contents Page
click
click
click
Diary of a Second Hand 15 year old Beamer (Maintenance - Battery Drain included...,
BMW E39 520i year 2000 Engine 1995cc)
M Series.
Workshop/Diary - Car Petrol Flap
28th April 2015 -
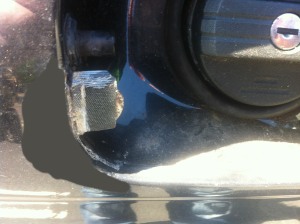
I also noticed with the E39, the flap 'well' sometimes collects water, hence the rust and the source of the problem. With an additional small drilled hole in the base, you will find a small indentaion, an ideal drill spot, to the right, this should do the trick and help with drainage and prevent further build up of rainwater. This now just leaves reinstalling the fuel flap. The metal can be slightly adjusted by tapping with a light hammer if your measurement are slightly out, fortunately mine was ok...the 'stop' does look a mess magnified, fortunately it is only an optical illusion and looks ok in realtime.
Another nice day and I decided to address another common problem and that is with the petrol flap area. Normally you have a metal protrusion to allow the petrol flap to be flush with the body of the car, however this snapped off a few weeks ago, making the flap look a mess, the common reason for this to happen is down to rust. For awhile now, every time I opened and closed the flap I would have to adjust this peice of metal as it was weak and it eventually became brittle through friction. I managed to find a right angled piece of metal off a shelf unit, (L shaped, two holes in each leaf).
Unbolt the two nuts and detach the whole flap from the vehicle to allow drill access. (Note: suggest attaching with glue or tape to assess the positioning before drilling a screw hole). By drilling a small hole, into the flap area on the car body, (near where the original metal came detached on the left just off centre to base - also noting you are in an area of a petrol tank so caution is advised i.e. heat, flame, boom! etc).
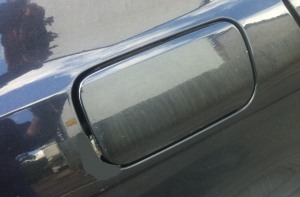
The small drilled hole is for either a tapping screw or a rivot can be used to securly attach the L' shaped metal stop. I then used some waterproof glue to each surface before chosing the screw and attaching to position. To finish off, I used a tyre patch, (innertube repair kit) cut to shape of the metal stop and stuck it to the surface of the metal this adds protection to the inner flap and prevents the metal from chipping paint and servere rusting. (A treatment, once rubbed down, a primer, paint can then be used to finish off).
There is some rust on the left side of the fuel well and is evident in the image, this was mainly caused by the accumilation of water inside the well. By drilling a hole will help to drain the rain water, however the paintwork on the main body will need some attention to bring it back to showroom condition - this is something I will need to get around to doing in the near future....
fig.
A - May require a further drain hole
B - Indentation - drill spot for drainage
A
Flap Stop repaired - leaves bodywork to be treated and resprayed
fig.
fig.
60
Metal Stop
B