© Copyright Reserved - United Kingdom
Ideal Screen Composition 1024 x 768
A free template by Lucknowwebs.com for WYSIWYG WebBuilder 8
5 Series Beamer
Diary of a Second Hand 15 year old Beamer (Maintenance - Battery Drain included...,
BMW E39 520i year 2000 Engine 1995cc)
M Series.
fig. Boot - Rear Fuse Cluster
18a
18
Workshop
fig. Note: 4 Ribs on this pully
Workshop/Diary- Alternator
This is what I should have done, checked the Alternator, especially:
a) pully, does it have 4 ribs or 5? This is important because the serpentine belt needs to fit width ways onto the pully and
the ribs of the belt needs to fit into the grooves of the pully.
b) Is there a 1, 2 or 3 pin connectors? For the e39 with Air Conditioning (AC), a 3 pin connector is required.
14th Feb 2015 - I managed to pick up an Alternator 120 Amp, (£40 Railway Salvage) I have given it a good clean to the point of seeing my reflection in the metal and thought I might venture out into the wilderness of suburbia to fit it, as it should only take an hour or so. (I don't know why I keep say that?) they can be fiddly, especially having to mess around with the serpentine belt. I did losen the radiator couling, just incase I required more 'fiddle room', however not necessary. The Serpentine Belt Tension Bolts can be awkward to access, (Steering Fluid Well and Upper Radiator Hoses can be in the way). The Alternator is held on to the block by three bolts, one on the top, front, left as you face it from the front of the vehicle and two bolts on the bottom, front, left and right of the Alternator. (Be careful not to take out the lower thin bolts as they belong to the lower bracket and not needed for this job - yes I did that too!) After taking the alternator out, I was ready to replace it with the replacement, only to find it had a pully with four ribs. I needed a five rib pully for the correct width and ribs of the sepentine belt. Not a problem as the original alternator had this and I just needed to swap the pully over to to the replacement to accomodate. Ideally, a bench vice can be useful to clamp the Alternator. To stop the pully rotating, two thin screwdrivers can be inserted into the two small holes situated 1 to 2 and 7 to 8 o'clock, (for this model, at least) this should prevent pully movement, (see following pages for more detail). Failing that, a large heavy screwdriver can be used to wedged into the fan, (Be careful not to damage internal wiring and especially the fan as this can later scrape inside the housing - make sure the fan fins are bent back to the original shape before operation - there should not be any scaping noises when the fan is rotating by hand - note: rotate in the arrow directionon the casing). After an hour of trying to get the retaining nut off the pully, (I hadn't got a vice or workbench) time was ticking by and it was starting to get dark, I decided to put the oringinal Alternator back on the vehicle, (so the vehicle could still be used). This time the job was, 'elusive from completion' and it was not going to be an easy fix as I had hoped. On returning the original Alternator unit to the vehicle there were problems with lining up the bolt holes and fitting in the main alternator body at the same time. I eventually worked it out, by lowering and pushing the alternator towards the engine block at the same time, this helped to line up the holes. Let us just say it was a tight fit!
I haven't given up on fitting the replacement Alternator, just postphoned it, this will allow me a little more time for the penertrating oil, (WD40) to work on the retaining nuts and good weather, before commencing with the job again...watch this space.
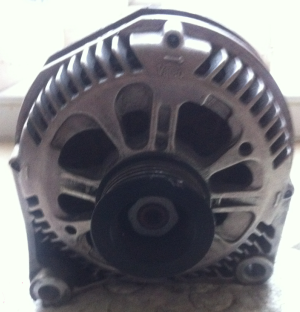
fig: My Relacement Alternator - Cleaned and Polished
Checking Alternator:
18b
Contents Page